Saturday, May 9, 2026
banner
Top Selling Multipurpose WP Theme

Deploying machine studying (ML) fashions into manufacturing is usually a posh and resource-intensive activity, particularly for purchasers with out deep ML or DevOps experience. Amazon SageMaker Canvas simplifies mannequin constructing by offering a code-free interface, so you need to use your current knowledge sources to create extremely correct ML fashions with out writing a single line of code. However constructing the mannequin is just half the battle. Environment friendly and cost-effective implementation is equally necessary. Amazon SageMaker Serverless Inference is designed for workloads with various site visitors patterns and idle intervals. Robotically provision and scale your infrastructure primarily based on demand, decreasing the necessity to handle servers and preconfigure capability.

This publish reveals you the right way to take an ML mannequin constructed on SageMaker Canvas and deploy it utilizing SageMaker Serverless Inference. This answer helps you go from mannequin creation to production-ready predictions rapidly and effectively with out managing infrastructure.

Resolution overview

Let us take a look at an instance workflow to exhibit making a serverless endpoint for a skilled mannequin in SageMaker Canvas.

  1. Add the skilled mannequin to the Amazon SageMaker mannequin registry.
  2. Create a brand new SageMaker mannequin with the right configuration.
  3. Create a serverless endpoint configuration.
  4. Deploy a serverless endpoint utilizing the mannequin and endpoint configuration you created.

You can too automate the method, as proven within the following diagram.

This instance deploys a pre-trained regression mannequin to a serverless SageMaker endpoint. On this manner, the mannequin can be utilized for quite a lot of workloads that don’t require real-time inference.

Conditions

As a prerequisite, you should have entry to Amazon Easy Storage Service (Amazon S3) and Amazon SageMaker AI. In case your account doesn’t have already got a SageMaker AI area configured, you additionally want permission to create a SageMaker AI area.

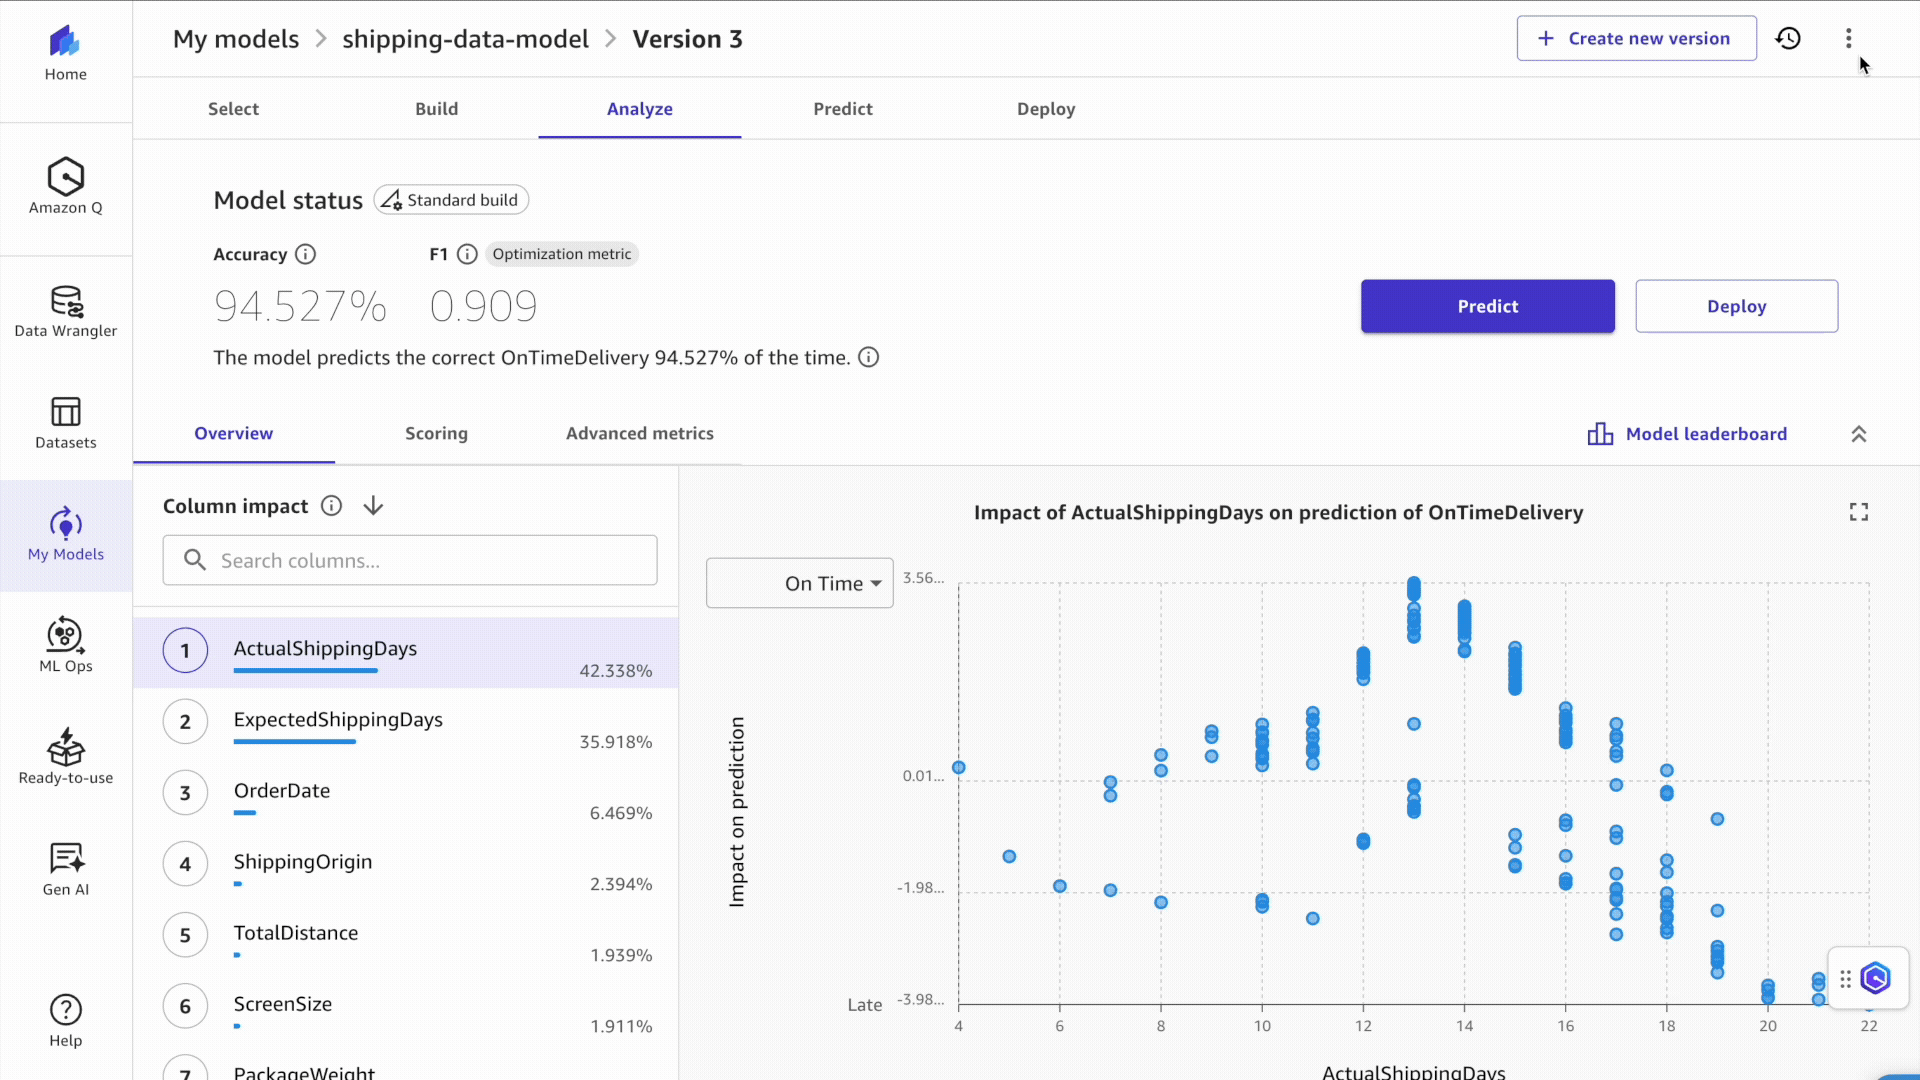
You additionally want a skilled regression or classification mannequin. You may prepare your SageMaker Canvas mannequin as typical. This consists of creating an Amazon SageMaker Knowledge Wrangler move, performing any crucial knowledge transformations, and choosing mannequin coaching settings. If you do not have a skilled mannequin but, you’ll be able to observe one of many following labs. Amazon SageMaker Canvas Immersion Day Please create one earlier than persevering with. This instance makes use of a classification mannequin skilled on the canvas-sample-shipping-logs.csv pattern dataset.

Save the mannequin to the SageMaker mannequin registry

To save lots of your mannequin to the SageMaker mannequin registry, observe these steps:

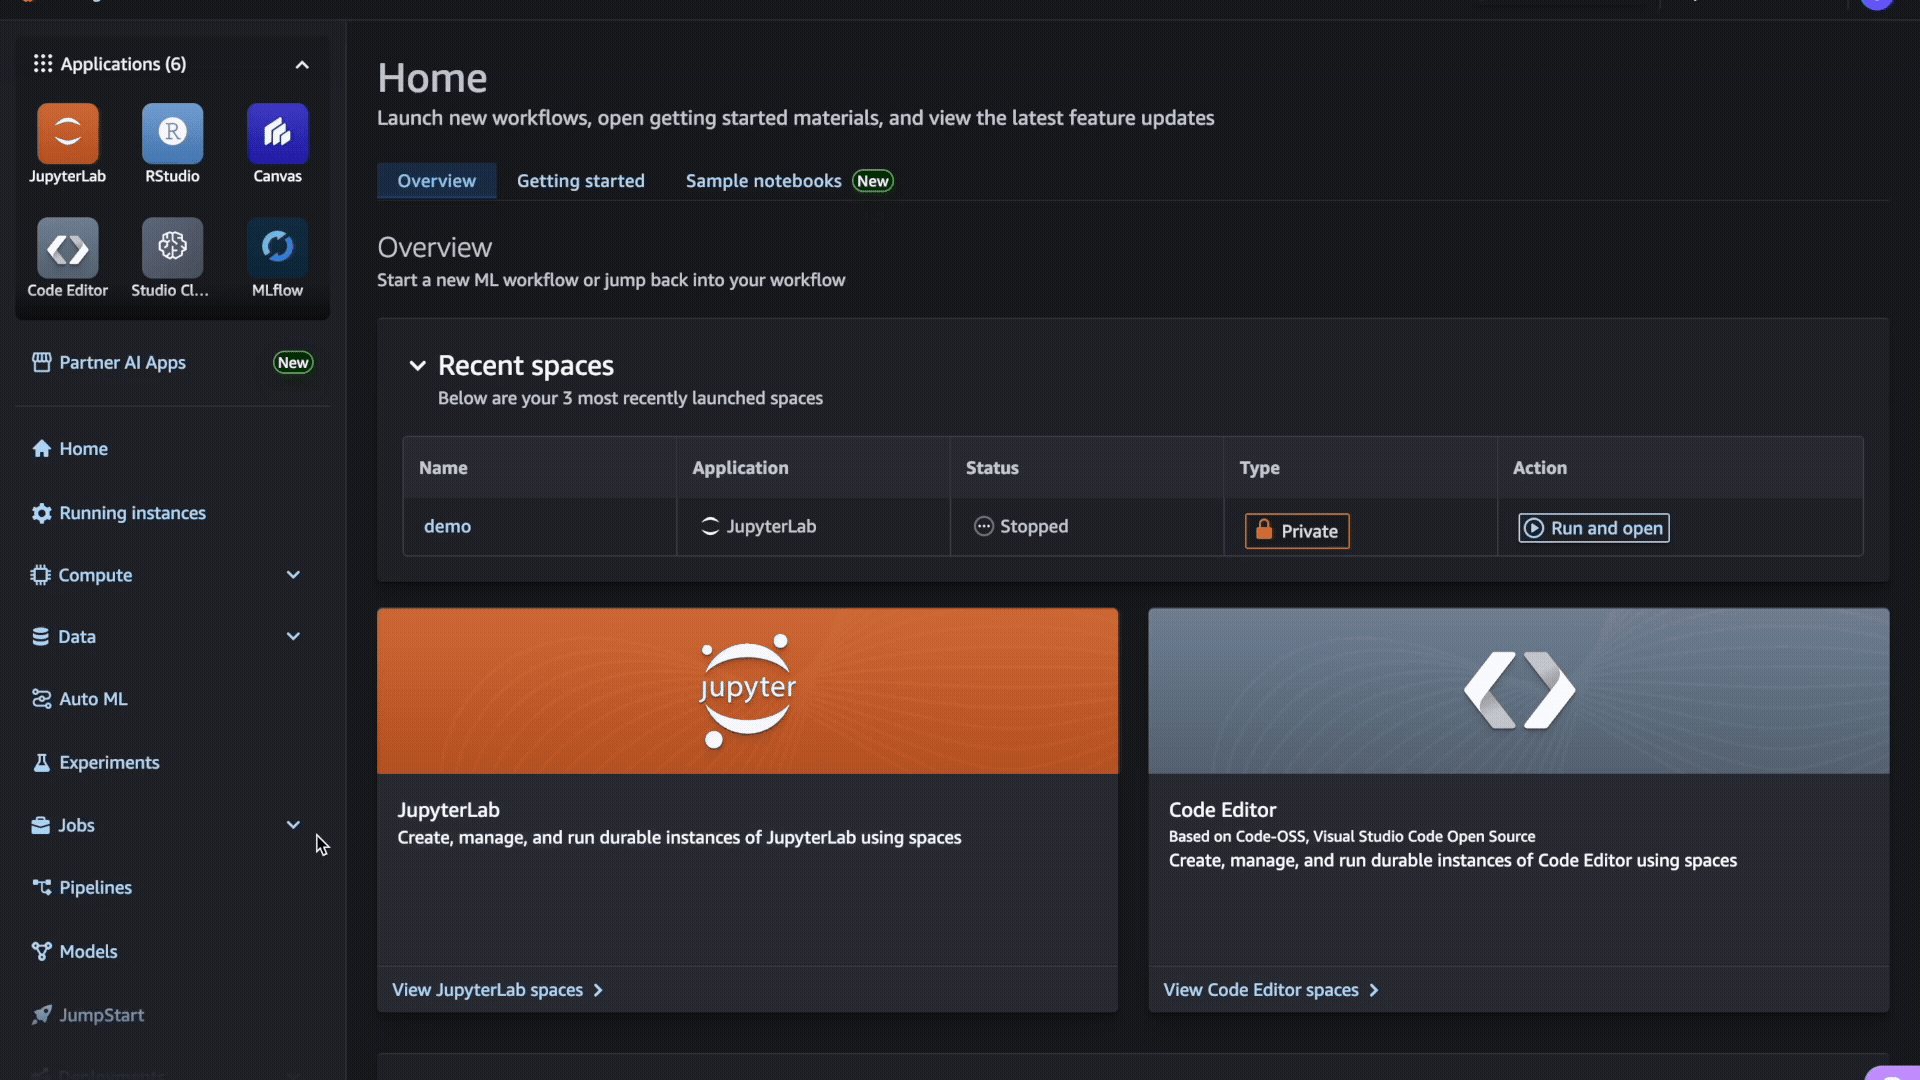
  1. Within the SageMaker AI console, choose: studio Launch Amazon SageMaker Studio.
  2. Within the SageMaker Studio interface, while you launch SageMaker Canvas, a brand new tab opens.

Open SageMaker Studio

  1. Discover the mannequin and mannequin model you need to deploy to your serverless endpoint.
  2. Within the choices menu (three vertical dots), choose: Add to mannequin registry.

Save to model registry

Now you can sign off and exit SageMaker Canvas. To handle prices and stop further workspace expenses, you may as well configure SageMaker Canvas to mechanically shut down when idle.

Approve mannequin deployment

After including the mannequin to the mannequin registry, do the next:

  1. Within the SageMaker Studio UI, choose: mannequin within the navigation pane.

Fashions exported from SageMaker Canvas have to be added in deployment standing. Ready for guide approval.

  1. Choose the model of the mannequin you need to deploy and replace the standing as follows: accepted Choose your deployment standing.

Search for the Deployment tab

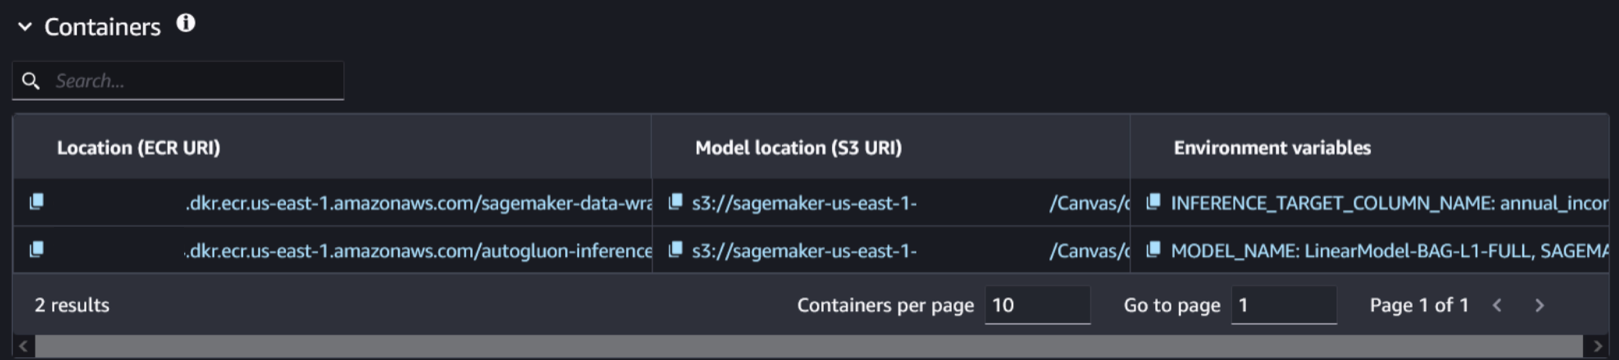
  1. Choose your mannequin model and navigate to: increase tab. This shows info associated to the mannequin and related containers.
  2. Choose the container and mannequin location related to the skilled mannequin. You may determine it by checking the existence of the setting variable SAGEMAKER_DEFAULT_INVOCATIONS_ACCEPT.

ECR and S3 URIs

Create a brand new mannequin

To create a brand new mannequin, observe these steps:

  1. As an alternative of closing the SageMaker Studio tab, open a brand new tab to open the SageMaker AI console.
  2. select mannequin in inference Please choose a piece Making a mannequin.
  3. Identify your mannequin.
  4. Go away the container enter possibility as is. Gives location for mannequin artifacts and inference photos and used CompressedModel kind.
  5. Enter the Amazon Elastic Container Registry (Amazon ECR) URI, Amazon S3 URI, and setting variables that you simply discovered within the earlier step.

Setting variables are displayed as a single line in SageMaker Studio within the following format:

SAGEMAKER_DEFAULT_INVOCATIONS_ACCEPT: textual content/csv, SAGEMAKER_INFERENCE_OUTPUT: predicted_label, SAGEMAKER_INFERENCE_SUPPORTED: predicted_label, SAGEMAKER_PROGRAM: tabular_serve.py, SAGEMAKER_SUBMIT_DIRECTORY: /decide/ml/mannequin/code

You could have completely different variables than within the earlier instance. All variables from setting variables have to be added to the mannequin. When creating a brand new mannequin, be certain that every setting variable is on a separate line.

model environment variables

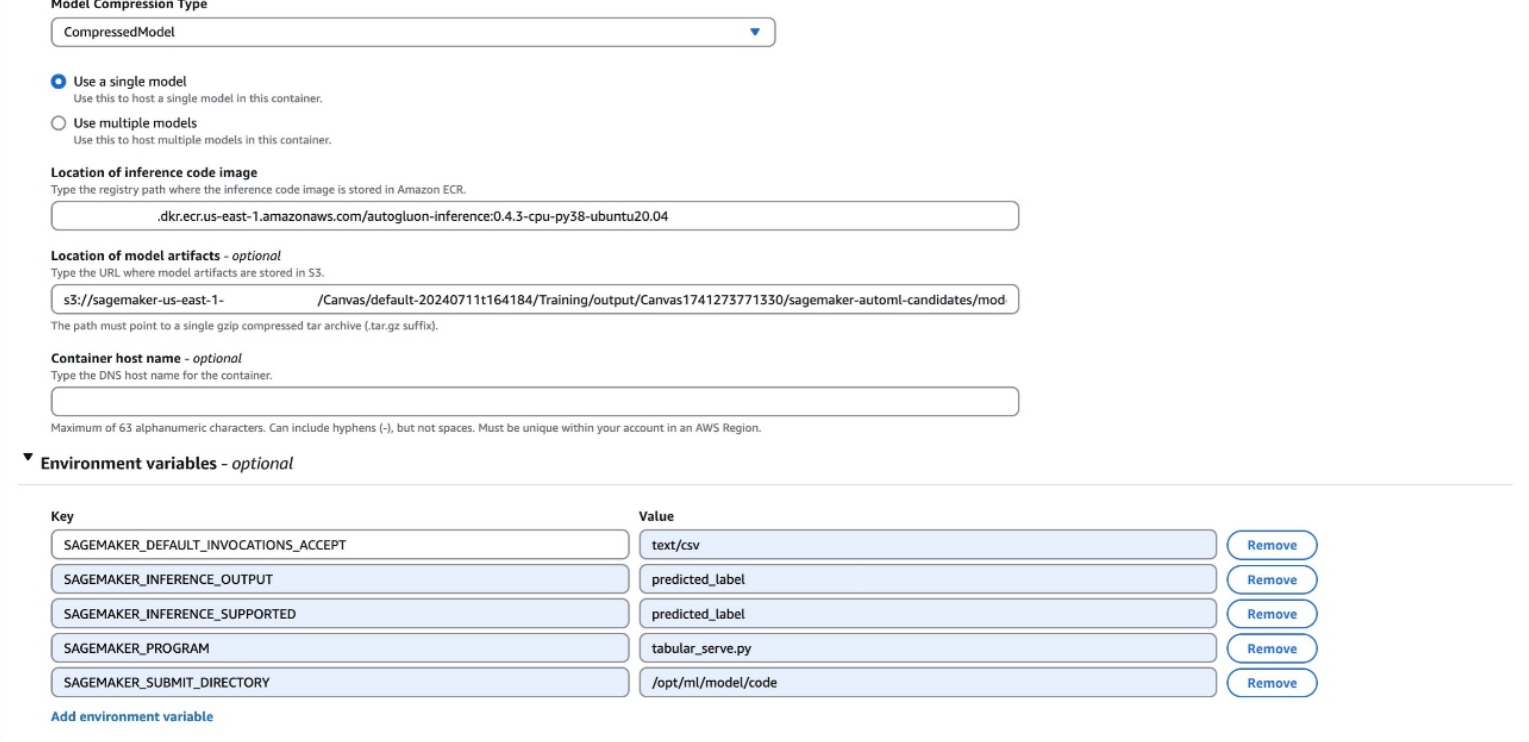
  1. select Making a mannequin.

Create an endpoint configuration

To create an endpoint configuration, observe these steps:

  1. Within the SageMaker AI console, choose: Endpoint configuration Create a brand new mannequin endpoint configuration.
  2. Set the endpoint kind as follows: serverless Set the mannequin variant to the mannequin created within the earlier step.

Model endpoint configuration

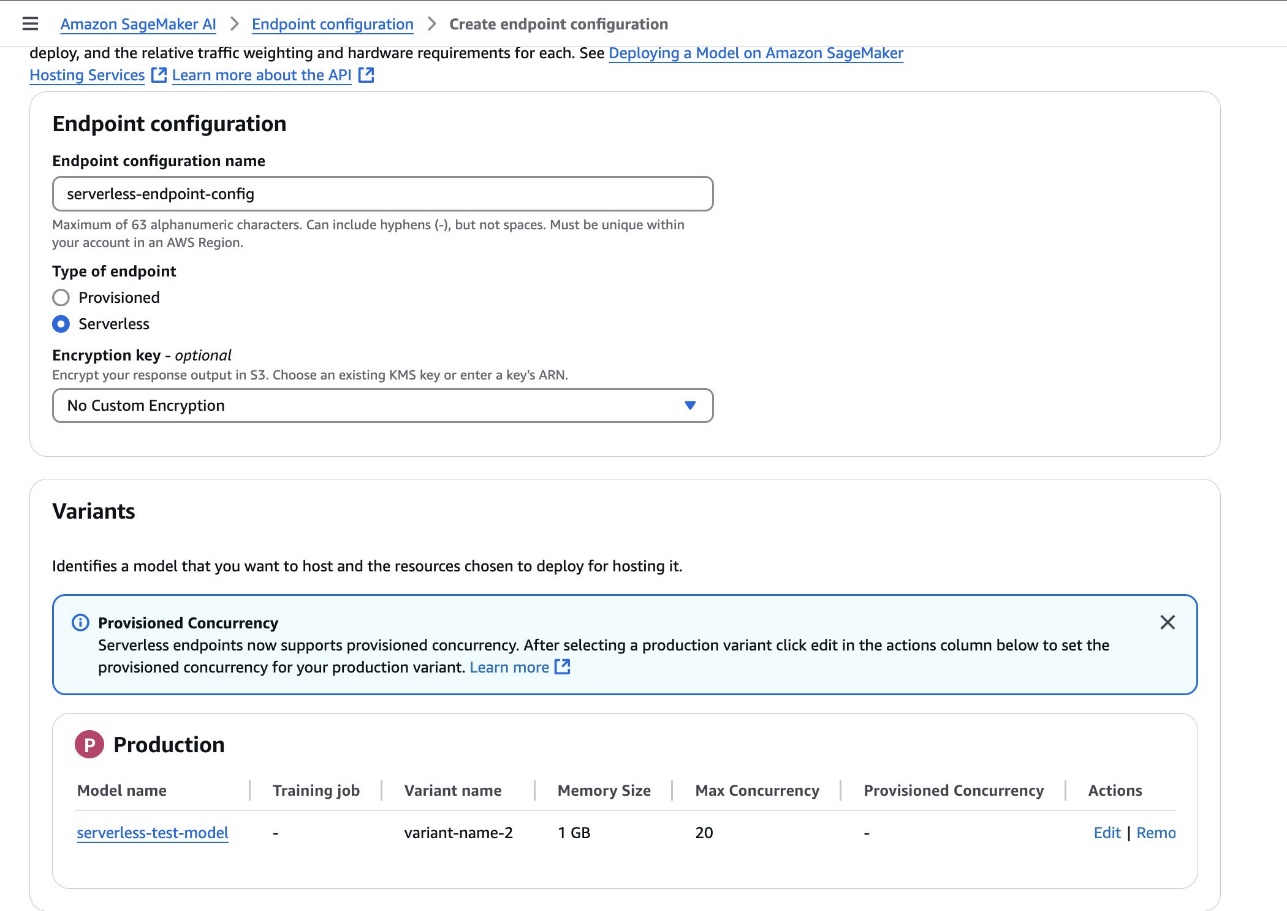
  1. select Creating an endpoint configuration.

Create an endpoint

To create an endpoint, observe these steps:

  1. Within the SageMaker AI console, choose: endpoint Create a brand new endpoint within the navigation pane.
  2. Identify your endpoint.
  3. Choose the endpoint configuration created within the earlier step, Choose endpoint configuration.
  4. select Creating an endpoint.

Creating a model endpoint

Creating the endpoint might take a couple of minutes. When the standing is up to date as follows: In operationClick on to start out calling the endpoint.

The next pattern code reveals the right way to name an endpoint from a Jupyter pocket book in a SageMaker Studio setting.

import boto3
import csv
from io import StringIO
import time

def invoke_shipping_prediction(options):
    sagemaker_client = boto3.consumer('sagemaker-runtime')
    
    # Convert to CSV string format
    output = StringIO()
    csv.author(output).writerow(options)
    payload = output.getvalue()
    
    response = sagemaker_client.invoke_endpoint(
        EndpointName="canvas-shipping-data-model-1-serverless-endpoint",
        ContentType="textual content/csv",
        Settle for="textual content/csv",
        Physique=payload
    )
    
    response_body = response['Body'].learn().decode()
    reader = csv.reader(StringIO(response_body))
    end result = listing(reader)[0]  # Get first row
    
    # Parse the response right into a extra usable format
    prediction = {
        'predicted_label': end result[0],
        'confidence': float(end result[1]),
        'class_probabilities': eval(end result[2]),  
        'possible_labels': eval(end result[3])       
    }
    
    return prediction

# Options for inference
features_set_1 = [
    "Bell",
    "Base",
    14,
    6,
    11,
    11,
    "GlobalFreight",
    "Bulk Order",
    "Atlanta",
    "2020-09-11 00:00:00",
    "Express",
    109.25199890136719
]

features_set_2 = [
    "Bell",
    "Base",
    14,
    6,
    15,
    15,
    "MicroCarrier",
    "Single Order",
    "Seattle",
    "2021-06-22 00:00:00",
    "Standard",
    155.0483856201172
]

# Invoke the SageMaker endpoint for function set 1
start_time = time.time()
end result = invoke_shipping_prediction(features_set_1)

# Print Output and Timing
end_time = time.time()
total_time = end_time - start_time

print(f"Complete response time with endpoint chilly begin: {total_time:.3f} seconds")
print(f"Prediction for function set 1: {end result['predicted_label']}")
print(f"Confidence for function set 1: {end result['confidence']*100:.2f}%")
print("nProbabilities for function set 1:")
for label, prob in zip(end result['possible_labels'], end result['class_probabilities']):
    print(f"{label}: {prob*100:.2f}%")


print("---------------------------------------------------------")

# Invoke the SageMaker endpoint for function set 2
start_time = time.time()
end result = invoke_shipping_prediction(features_set_2)

# Print Output and Timing
end_time = time.time()
total_time = end_time - start_time

print(f"Complete response time with heat endpoint: {total_time:.3f} seconds")
print(f"Prediction for function set 2: {end result['predicted_label']}")
print(f"Confidence for function set 2: {end result['confidence']*100:.2f}%")
print("nProbabilities for function set 2:")
for label, prob in zip(end result['possible_labels'], end result['class_probabilities']):
    print(f"{label}: {prob*100:.2f}%")

Automate processes

To mechanically create a serverless endpoint every time a brand new mannequin is accepted, you need to use the next YAML file with AWS CloudFormation. This file automates the creation of a SageMaker endpoint with the required configuration.

This pattern CloudFormation template is offered for inspiration solely and isn’t supposed for direct use in a manufacturing setting. Builders ought to totally take a look at this template based on their group’s safety tips earlier than deployment.

AWSTemplateFormatVersion: "2010-09-09"
Description: Template for creating Lambda operate to deal with SageMaker mannequin
  package deal state modifications and create serverless endpoints

Parameters:
  MemorySizeInMB:
    Kind: Quantity
    Default: 1024
    Description: Reminiscence dimension in MB for the serverless endpoint (between 1024 and 6144)
    MinValue: 1024
    MaxValue: 6144

  MaxConcurrency:
    Kind: Quantity
    Default: 20
    Description: Most variety of concurrent invocations for the serverless endpoint
    MinValue: 1
    MaxValue: 200

  AllowedRegion:
    Kind: String
    Default: "us-east-1"
    Description: AWS area the place SageMaker sources may be created

  AllowedDomainId:
    Kind: String
    Description: SageMaker Studio area ID that may set off deployments
    NoEcho: true

  AllowedDomainIdParameterName:
    Kind: String
    Default: "/sagemaker/serverless-deployment/allowed-domain-id"
    Description: SSM Parameter identify containing the SageMaker Studio area ID that may set off deployments

Sources:
  AllowedDomainIdParameter:
    Kind: AWS::SSM::Parameter
    Properties:
      Identify: !Ref AllowedDomainIdParameterName
      Kind: String
      Worth: !Ref AllowedDomainId
      Description: SageMaker Studio area ID that may set off deployments

  SageMakerAccessPolicy:
    Kind: AWS::IAM::ManagedPolicy
    Properties:
      Description: Managed coverage for SageMaker serverless endpoint creation
      PolicyDocument:
        Model: "2012-10-17"
        Assertion:
          - Impact: Enable
            Motion:
              - sagemaker:CreateModel
              - sagemaker:CreateEndpointConfig
              - sagemaker:CreateEndpoint
              - sagemaker:DescribeModel
              - sagemaker:DescribeEndpointConfig
              - sagemaker:DescribeEndpoint
              - sagemaker:DeleteModel
              - sagemaker:DeleteEndpointConfig
              - sagemaker:DeleteEndpoint
            Useful resource: !Sub "arn:aws:sagemaker:${AllowedRegion}:${AWS::AccountId}:*"
          - Impact: Enable
            Motion:
              - sagemaker:DescribeModelPackage
            Useful resource: !Sub "arn:aws:sagemaker:${AllowedRegion}:${AWS::AccountId}:model-package/*/*"
          - Impact: Enable
            Motion:
              - iam:PassRole
            Useful resource: !Sub "arn:aws:iam::${AWS::AccountId}:position/service-role/AmazonSageMaker-ExecutionRole-*"
            Situation:
              StringEquals:
                "iam:PassedToService": "sagemaker.amazonaws.com"
          - Impact: Enable
            Motion:
              - ssm:GetParameter
            Useful resource: !Sub "arn:aws:ssm:${AllowedRegion}:${AWS::AccountId}:parameter${AllowedDomainIdParameterName}"

  LambdaExecutionRole:
    Kind: AWS::IAM::Function
    Properties:
      AssumeRolePolicyDocument:
        Model: "2012-10-17"
        Assertion:
          - Impact: Enable
            Principal:
              Service: lambda.amazonaws.com
            Motion: sts:AssumeRole
      ManagedPolicyArns:
        - arn:aws:iam::aws:coverage/service-role/AWSLambdaBasicExecutionRole
        - !Ref SageMakerAccessPolicy

  ModelDeploymentFunction:
    Kind: AWS::Lambda::Perform
    Properties:
      Handler: index.handler
      Function: !GetAtt LambdaExecutionRole.Arn
      Code:
        ZipFile: |
          import os
          import json
          import boto3

          sagemaker_client = boto3.consumer('sagemaker')
          ssm_client = boto3.consumer('ssm')

          def handler(occasion, context):
              print(f"Obtained occasion: {json.dumps(occasion, indent=2)}")
              attempt:
                  # Get particulars instantly from the occasion
                  element = occasion['detail']
                  print(f'element: {element}')
                  
                  # Get allowed area ID from SSM Parameter Retailer
                  parameter_name = os.environ.get('ALLOWED_DOMAIN_ID_PARAMETER_NAME')
                  attempt:
                      response = ssm_client.get_parameter(Identify=parameter_name)
                      allowed_domain = response['Parameter']['Value']
                  besides Exception as e:
                      print(f"Error retrieving parameter {parameter_name}: {str(e)}")
                      allowed_domain = '*'  # Default fallback
                  
                  # Examine if area ID is allowed
                  if allowed_domain != '*':
                      created_by_domain = element.get('CreatedBy', {}).get('DomainId')
                      if created_by_domain != allowed_domain:
                          print(f"Area {created_by_domain} not allowed. Allowed: {allowed_domain}")
                          return {'statusCode': 403, 'physique': 'Area not licensed'}

                  # Get the mannequin package deal ARN from the occasion sources
                  model_package_arn = occasion['resources'][0]

                  # Get the mannequin package deal particulars from SageMaker
                  model_package_response = sagemaker_client.describe_model_package(
                      ModelPackageName=model_package_arn
                  )

                  # Parse mannequin identify and model from ModelPackageName
                  model_name, model = element['ModelPackageName'].cut up('/')
                  serverless_model_name = f"{model_name}-{model}-serverless"

                  # Get all container particulars instantly from the occasion
                  container_defs = element['InferenceSpecification']['Containers']

                  # Get the execution position from the occasion and convert to correct IAM position ARN format
                  assumed_role_arn = element['CreatedBy']['IamIdentity']['Arn']
                  execution_role_arn = assumed_role_arn.substitute(':sts:', ':iam:')
                                                   .substitute('assumed-role', 'position/service-role')
                                                   .rsplit('/', 1)[0]

                  # Put together containers configuration for the mannequin
                  containers = []
                  for i, container_def in enumerate(container_defs):
                      # Get setting variables from the mannequin package deal for this container
                      environment_vars = model_package_response['InferenceSpecification']['Containers'][i].get('Setting', {}) or {}
                      
                      containers.append({
                          'Picture': container_def['Image'],
                          'ModelDataUrl': container_def['ModelDataUrl'],
                          'Setting': environment_vars
                      })

                  # Create mannequin with all containers
                  if len(containers) == 1:
                      # Use PrimaryContainer if there's just one container
                      create_model_response = sagemaker_client.create_model(
                          ModelName=serverless_model_name,
                          PrimaryContainer=containers[0],
                          ExecutionRoleArn=execution_role_arn
                      )
                  else:
                      # Use Containers parameter for a number of containers
                      create_model_response = sagemaker_client.create_model(
                          ModelName=serverless_model_name,
                          Containers=containers,
                          ExecutionRoleArn=execution_role_arn
                      )

                  # Create endpoint config
                  endpoint_config_name = f"{serverless_model_name}-config"
                  create_endpoint_config_response = sagemaker_client.create_endpoint_config(
                      EndpointConfigName=endpoint_config_name,
                      ProductionVariants=[{
                          'VariantName': 'AllTraffic',
                          'ModelName': serverless_model_name,
                          'ServerlessConfig': {
                              'MemorySizeInMB': int(os.environ.get('MEMORY_SIZE_IN_MB')),
                              'MaxConcurrency': int(os.environ.get('MAX_CONCURRENT_INVOCATIONS'))
                          }
                      }]
                  )

                  # Create endpoint
                  endpoint_name = f"{serverless_model_name}-endpoint"
                  create_endpoint_response = sagemaker_client.create_endpoint(
                      EndpointName=endpoint_name,
                      EndpointConfigName=endpoint_config_name
                  )

                  return {
                      'statusCode': 200,
                      'physique': json.dumps({
                          'message': 'Serverless endpoint deployment initiated',
                          'endpointName': endpoint_name
                      })
                  }

              besides Exception as e:
                  print(f"Error: {str(e)}")
                  increase
      Runtime: python3.12
      Timeout: 300
      MemorySize: 128
      Setting:
        Variables:
          MEMORY_SIZE_IN_MB: !Ref MemorySizeInMB
          MAX_CONCURRENT_INVOCATIONS: !Ref MaxConcurrency
          ALLOWED_DOMAIN_ID_PARAMETER_NAME: !Ref AllowedDomainIdParameterName

  EventRule:
    Kind: AWS::Occasions::Rule
    Properties:
      Description: Rule to set off Lambda when SageMaker Mannequin Package deal state modifications
      EventPattern:
        supply:
          - aws.sagemaker
        detail-type:
          - SageMaker Mannequin Package deal State Change
        element:
          ModelApprovalStatus:
            - Authorised
          UpdatedModelPackageFields:
            - ModelApprovalStatus
      State: ENABLED
      Targets:
        - Arn: !GetAtt ModelDeploymentFunction.Arn
          Id: ModelDeploymentFunction

  LambdaInvokePermission:
    Kind: AWS::Lambda::Permission
    Properties:
      FunctionName: !Ref ModelDeploymentFunction
      Motion: lambda:InvokeFunction
      Principal: occasions.amazonaws.com
      SourceArn: !GetAtt EventRule.Arn

Outputs:
  LambdaFunctionArn:
    Description: ARN of the Lambda operate
    Worth: !GetAtt ModelDeploymentFunction.Arn
  EventRuleArn:
    Description: ARN of the EventBridge rule
    Worth: !GetAtt EventRule.Arn

This stack limits automated creation of serverless endpoints to particular AWS Areas and domains. Yow will discover your area ID when accessing SageMaker Studio from the SageMaker AI console or by operating the next command: aws sagemaker list-domains —area [your-region]

cleansing

To handle your prices and keep away from incurring further expenses to your workspace, ensure you sign off of SageMaker Canvas. In case you used a Jupyter pocket book to check your endpoints, you’ll be able to selectively shut down your JupyterLab occasion. Cease Alternatively, configure automated shutdown of JupyterLab.

Stop Jupyter Lab Space

This publish confirmed the right way to use SageMaker Serverless Inference to deploy SageMaker Canvas fashions to serverless endpoints. This serverless strategy lets you rapidly and effectively ship predictions from SageMaker Canvas fashions with out managing the underlying infrastructure.

This seamless deployment expertise is only one instance of how AWS providers like SageMaker Canvas and SageMaker Serverless Inference simplify your ML efforts and assist corporations of assorted sizes and technical sophistication unlock the worth of AI and ML. As you proceed exploring the SageMaker ecosystem, be sure you learn to unlock knowledge governance for no-code ML utilizing Amazon DataZone and seamlessly transition between no-code and code-first mannequin growth utilizing SageMaker Canvas and SageMaker Studio.


Concerning the creator

Nadiya Polanco I am an AWS Options Architect primarily based in Brussels, Belgium. On this position, she helps organizations trying to incorporate AI and machine studying into their workloads. In her free time, Nadiya enjoys her ardour for espresso and journey.

Brajendra Singh He’s a Principal Options Architect at Amazon Internet Providers, the place he companions with enterprise prospects to design and implement revolutionary options. With a powerful background in software program growth, he brings deep experience in knowledge analytics, machine studying, and generative AI.

banner
Top Selling Multipurpose WP Theme

Converter

Top Selling Multipurpose WP Theme

Newsletter

Subscribe my Newsletter for new blog posts, tips & new photos. Let's stay updated!

banner
Top Selling Multipurpose WP Theme

Leave a Comment

banner
Top Selling Multipurpose WP Theme

Latest

Best selling

22000,00 $
16000,00 $
6500,00 $

Top rated

6500,00 $
22000,00 $
900000,00 $

Products

Knowledge Unleashed
Knowledge Unleashed

Welcome to Ivugangingo!

At Ivugangingo, we're passionate about delivering insightful content that empowers and informs our readers across a spectrum of crucial topics. Whether you're delving into the world of insurance, navigating the complexities of cryptocurrency, or seeking wellness tips in health and fitness, we've got you covered.