


When implementing machine studying (ML) workflows with Amazon Sagemaker Canvas, organizations may have to contemplate the exterior dependencies wanted for a specific use case. Sagemaker Canvas presents highly effective no-code and low-code performance for fast experiments, however some tasks could require specialised dependencies and libraries that aren’t included in Sagemaker Canvas by default. This submit supplies an instance of the best way to incorporate code that will depend on exterior dependencies into the Sagemaker Canvas workflow.
Amazon Sagemaker Canvas is a low-code, no-code (LCNC) ML platform that guides you thru each step of the ML journey, from making ready preliminary information to deploying the ultimate mannequin. With out writing a single line of code, customers can discover datasets, rework information, construct fashions, and generate predictions.
Sagemaker Canvas presents complete information relaunching capabilities that show you how to put together your information, together with:
- Over 300 built-in conversion steps
- Purposeful Engineering Operate
- Knowledge normalization and cleaning features
- Customized code editors that assist Python, Pyspark, and Sparksql
This submit reveals you the best way to embody dependencies saved in Amazon Easy Storage Service (Amazon S3) inside an Amazon Sagemaker Knowledge Wrangler Circulate. This strategy can be utilized to run customized scripts that depend on modules which might be basically not supported by Sagemaker Canvas.
Resolution overview
To showcase customized scripts and dependencies integration from Amazon S3 to Sagemaker Canvas, we contemplate the next workflow:
The answer follows three most important steps:
- Add customized scripts and dependencies to Amazon S3
- Use Sagemaker Knowledge Wrangler to make use of Sagemaker Canvas to transform information utilizing uploaded code
- Practice and export fashions
The next diagram reveals the structure of the answer.
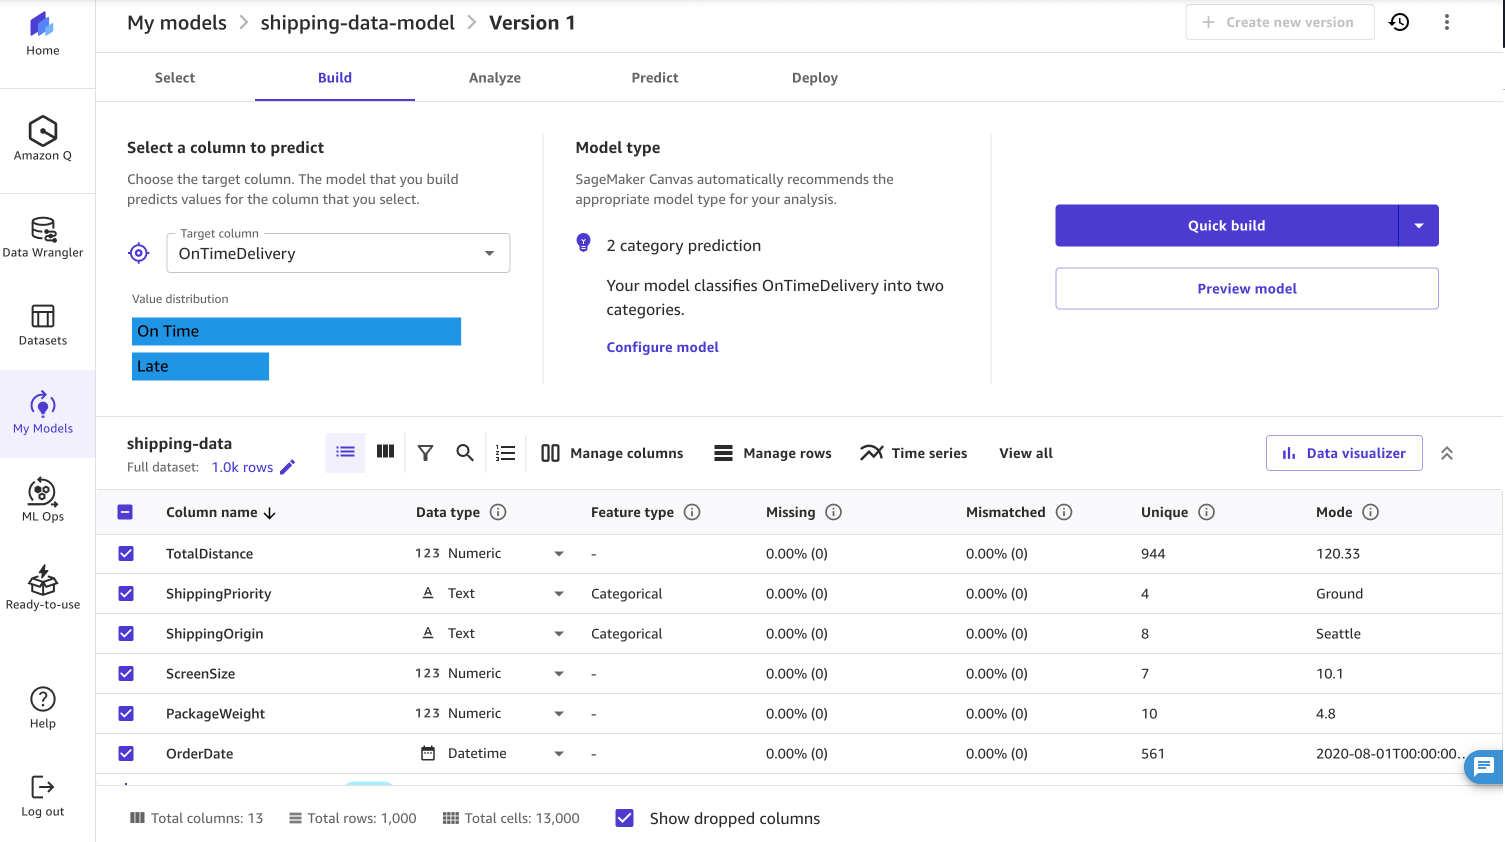
This instance makes use of two complementary datasets out there in Sagemaker Canvas, containing supply info for pc display screen supply. By combining these datasets, we create a complete dataset that captures numerous supply metrics and supply outcomes. Our aim is to construct a predictive mannequin that may decide whether or not future shipments will arrive on time primarily based on future delivery patterns and traits.
Stipulations
As a prerequisite, you need to entry Amazon S3 and Amazon Sagemaker AI. If you don’t have already got a Sagemaker AI area configured together with your account, additionally, you will want permissions to create a Sagemaker AI area.
Create an information movement
To create an information movement:
- Amazon Sagemaker AI Console, beneath the navigation pane Functions and IDEs,selection canvasas proven within the following screenshot. If you have not performed so but, chances are you’ll must create a sage maker area.
- As soon as the area is created, choose it Open the canvas.

- On the canvas, choose Dataset Choose the tab and Canvas-Pattern-shipping-logs.csv as proven within the following screenshot. When the preview seems, choose it + Create an information movement.

The primary information movement opens with one supply and one information kind.
- Choose it within the prime proper nook of the display screen Add information → Floor. select Canvas Knowledge Set Choose Canvas-Pattern-Product-Descriptions.csv because the supply.
- select Subsequent As proven within the following screenshot. Subsequent, choose Import.

- As soon as each datasets have been added, choose the plus signal. From the drop-down menu,[選択]Choose Mix information. Choose from the next drop-down menu take part.

- To carry out ProductID column, right-hand menu, backside inside be a part of Take part in kindselect Interior bond. beneath Be part of keyselect ProductIdas proven within the following screenshot.

- As soon as the datasets are mixed, choose the plus signal. Within the drop-down menu, choose + Add a conversion. A preview of the dataset opens.
The dataset incorporates the XshippingDistance (LONG) and YSHIPPINGDISTANCE (LONG) columns. For our functions, we have to use a customized perform to seek out the overall distance utilizing x and y coordinates and drop particular person coordinate columns. On this instance, we use a perform that will depend on the MPMATH library to seek out the overall distance.
- To name a customized perform, choose + Add a conversion. Within the drop-down menu, choose Customized conversion. Change the editor Python (Panda) Strive operating the next perform from the Python editor:
Once I run the perform, I get the next error: ModulenotFounderror: There is no such thing as a module named “mpmath” as proven within the following screenshot.

This error happens as a result of MPMATH shouldn’t be a module that’s basically supported by Sagemaker Canvas. To make use of features that depend on this module, it’s good to strategy the usage of customized features another way.
Zip scripts and dependencies
To make use of features that depend on modules that aren’t natively supported on the canvas, you need to zip the customized script with the module that depends on. On this instance, I created a Script.py that depends on the MPMATH library utilizing an area built-in growth atmosphere (IDE).
The script.py file incorporates two features: Comprises one perform appropriate with Python (Pandas) Runtime (perform). calculate_total_distance), and Python (Pyspark) runtime (appropriate with features) udf_total_distance).
To confirm that you could run the script, run mpmath and set up it in the identical listing as script.py pip set up mpmath.
run zip -r my_project.zip Create a .ZIP file containing the features and MPMATH set up. The present listing incorporates the .ZIP file, Python scripts, and script installations, as proven within the following screenshot:

Add to Amazon S3
After creating the .zip file, add it to your Amazon S3 bucket.

As soon as the ZIP file is uploaded to Amazon S3, it may be accessed with Sagemaker Canvas.
Run the customized script
Return to the dataflow in Sagemaker Canvas and choose the earlier customized perform code with the next code replace.
This instance code unzips the .zip file and provides the required dependencies to the native path in order that they can be utilized within the perform at runtime. MPMATH has been added to the native path, so you’ll be able to name features that depend on this exterior library.
The earlier code is run utilizing Python (Pandas) Runtime and Calculate_Total_Distance features. To make use of the python (pyspark) runtime, replace the function_name variable and name the udf_total_distance perform as an alternative.
Full the info movement
The ultimate step is to take away any unrelated columns earlier than coaching the mannequin. Comply with these steps:
- Within the Sagemaker Canvas Console, choose + Add a conversion. Choose from the drop-down menu Handle columns
- beneath Transformationselect Drop row. beneath The drop rowadd ProductID_0, ProductID_1, OrderID as proven within the following screenshot.

The ultimate dataset should include 13 columns. The whole information movement is depicted within the following picture:

Practice the mannequin
To coach your mannequin, observe these steps:
- Choose within the prime proper of the web page Create a mannequin Title the dataset and mannequin.
- Choose Predictive evaluation As the kind of downside Ontime supply Because the goal column, as proven within the screenshot under.
When constructing a mannequin, you’ll be able to select to run a fast construct or a regular construct. Fast construct prioritizes velocity over accuracy and generates a educated mannequin inside 20 minutes. Normal builds prioritize latency accuracy, however coaching the mannequin takes time.
consequence
As soon as the mannequin construct is full, you’ll be able to view the accuracy of the mannequin together with metrics corresponding to F1, Precision, and Recall. For traditional builds, the mannequin achieved 94.5% accuracy.

After mannequin coaching is full, there are 4 methods you should utilize the mannequin:
- Deploy a mannequin instantly from the surge maker canvas to the endpoint
- Add the mannequin to the SageMaker mannequin registry
- Export the mannequin to a Jupyter pocket book
- Ship the mannequin to Amazon Quicksight to be used in dashboard visualizations
cleansing
Select to handle prices and stop further workspace charges Log off Signal out of the Sagemaker canvas when the applying is full, as proven within the following screenshot. You too can configure Sagemaker Canvas to routinely shut down when idle.
In case you created an S3 bucket on this instance, you may also empty the bucket and delete it.

abstract
On this submit, I confirmed you the best way to add customized dependencies to Amazon S3 and combine them into your Sagemaker Canvas workflow. By strolling by way of a sensible instance of implementing a customized distance calculation perform utilizing the MPMATH library, we demonstrated the next technique:
- Bundle customized code and dependencies right into a .zip file
- Save and entry these dependencies from Amazon S3
- Implement customized information transformations in Sagemaker Knowledge Wrangler
- Practice your predictive mannequin utilizing reworked information
This strategy signifies that information scientists and analysts can prolong Sagemaker Canvas capabilities past over 300 options.
To attempt Customized Transforms Your self, please consult with the Amazon Sagemaker Canvas documentation and sign up to Sagemaker Canvas immediately. For added insights on the best way to optimize your Sagemaker Canvas implementation, we advocate exploring these associated posts.
Concerning the Creator
 Nadya Polanko I’m an Affiliate Options Architect at AWS primarily based in Brussels, Belgium. This function helps organizations trying to incorporate AI and machine studying into their workloads. In her free time, Nadya enjoys indulging in her ardour for espresso and exploring new locations.
