


This put up initially appeared on all3dp.com
3D printing includes a number of phases, from designing the mannequin to making ready it for printing and eventually executing the print. It requires varied software program options, together with CAD applications to design the mannequin, slicers to transform these designs into G-code, and firmware to manage the printer’s operation.
CAD software program
To create detailed 3D fashions, computer-aided design (CAD) software program is important, and whereas there are lots of choices accessible, there are some which are notably good for learners.
Tinkercad is a free, web-based CAD software program from Autodesk that’s accessible and simple to make use of, making it perfect for learners and academic use.
Sketchup Free is understood for its simplicity and ease of use. You can begin with a primary geometric form after which modify it to create an in depth 3D mannequin. Furthermore, 3D Warehouse features a huge library of pre-made fashions that you would be able to combine into your designs.
and fusion 360 is a complete CAD, CAM, and CAE device developed by Autodesk. This cloud-based software program provides intensive instruments for parametric modeling, mesh modeling, and generative design, making it perfect for superior customers.
Slicer Software program
Slicer software program converts your 3D mannequin into directions that your 3D printer can perceive. Relying in your objective, there are totally different choices. Developed by UltiMaker. Cura is a free and open supply slicer that helps a variety of 3D printers, provides a user-friendly interface, permits intensive customization of print settings, consists of adaptive layers and quite a lot of different options. Support options.
Initially based mostly on Slic3r Pulsa slicer Developed by Prusa Analysis, it has superior options and is optimized for Prusa 3D printers, however can be used with different printers. Detailed settings and Advanced Features Appropriate for each learners and skilled customers.
Simple 3D is a premium slicer software program identified for its detailed management over print settings and high-quality assist construction. Though it’s not free, many customers might discover it well worth the funding attributable to its complete options and talent to optimize print high quality and effectivity.
Slicer Software program – Prusa

Pulsa slicer It boasts a user-friendly interface with an intuitive format. The clear design and icon-based UI make it simple to navigate and entry varied settings. The software program additionally provides a spread of customization choices, permitting you to tweak parameters similar to: Layer peak, packing density, printing velocity, assist construction.
One of many distinctive options of PrusaSlicer is Variable layer peak. This function permits totally different sections of a mannequin to be printed at totally different layer heights, leading to smoother contours and finer particulars. 17 totally different filling patterns This choice provides you extra management over the interior construction of your print.
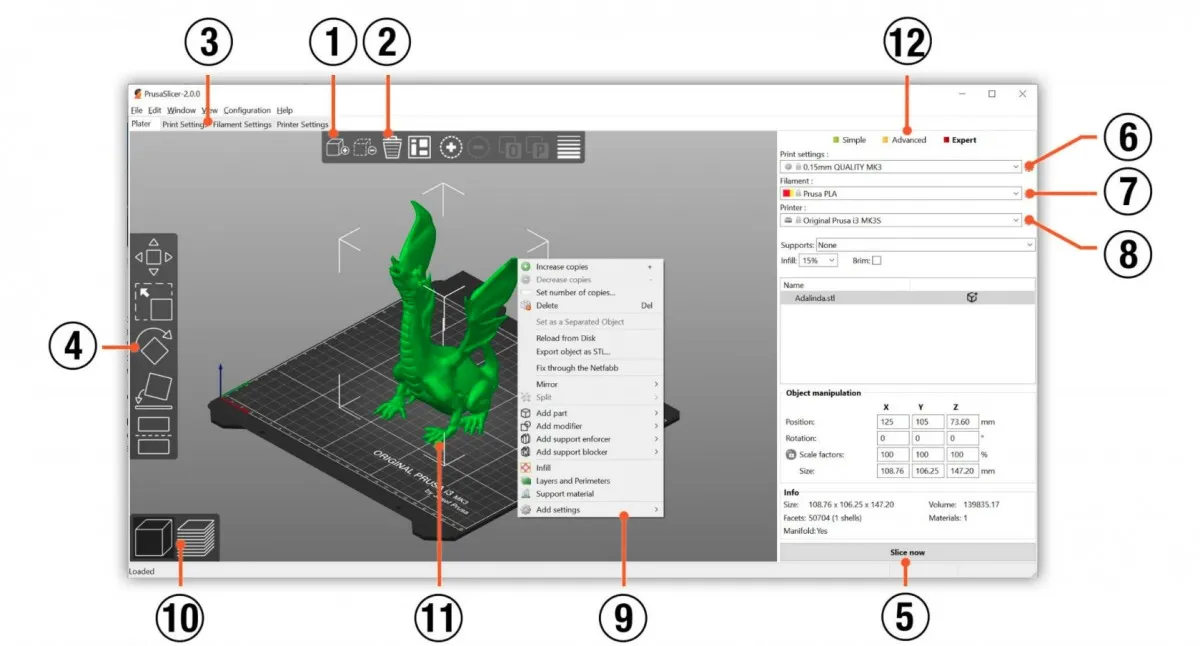
Overview of PrusaSlicer’s UI:
1. The Add button masses the mannequin into PrusaSlicer2. The Delete and Delete All buttons take away the fashions from PrusaSlicer.
3. Open Print, Filament and Printer Superior Settings
4. Transfer, scale, rotate, place on face, lower instruments
5. Slice and generate G-Code buttons
6. Print high quality/velocity settings
7. Materials Choice
8. Choose a printer
9. Proper-click on the mannequin to open the context menu
10. Swap between the 3D Editor and Layer Preview
11. Mannequin Preview
12. Swap between Easy/Superior/Knowledgeable modes
Professionals and Cons of PrusaSlicer:
Robust Factors:
- Works seamlessly with Prusa printers
- Frequent updates and ongoing growth
- Variable layer peak for improved print high quality
- Light-weight set up and quick file dealing with
- Intuitive assist era utilizing “paint-on” performance
- Free and open supply
Cons:
- Restricted customization choices in comparison with different slicers
- Assist and documentation might not be as complete as opponents
Cura: Versatile and simple to make use of
Cura It’s a standard slicer software program broadly used within the 3D printing neighborhood. Developed by Ultimaker, Cura is understood for its user-friendly interface and flexibility. It was initially developed as a slicing software program for the Ultimaker Unique 3D printer and has since advanced into a strong device. Suitable with quite a lot of 3D printer fashions.
Consumer Interface and Options
Cura has a drop-down menu-based interface and a clear primary window. The software program provides quite a lot of printer and materials profiles, making it simple to seek out the suitable settings to your explicit setup. Cura additionally consists of superior options similar to gap-free toolpaths and integration with main CAD platforms similar to Solidworks and Autodesk Inventor.
One of many notable options of Cura is Cura Marketplaceprovides you entry to a variety of plugins that improve the performance of the software program, extending its options and permitting you to customise your printing expertise. The Market provides plugins for duties similar to calibration assessments, temperature towers, and extra.
A fast take a look at Cura’s UI:
1. Open file 2. Printer choice panel
3. Settings Panel
4. Stage
5. Print Settings Panel
6. Market
7. App Switcher
8. UltiMaker Account
9. Motion Panel
10. Save or share a file
11. Preview
12. Digicam Place Software
13. Mannequin Data
14. Adjustment Instruments
Professionals and Cons of Cura
Robust Factors:
- Superior engine and gap-free toolpaths
- Integration with main CAD platforms
- Intensive library of printer and materials profiles
- Cura Market for extra plugins
- Free and open supply
Cons:
- Slicing is sluggish on massive or advanced fashions
- Some options are solely accessible within the paid model
- Restricted person interface customization choices
- Some options require an web connection
firmware
firmware It runs on the 3D printer’s management board and manages its operation.
Marlin might be essentially the most broadly used firmware for 3D printers. It’s open supply, extremely customizable, and helps a variety of options and {hardware} configurations. Marlin provides options similar to: Automatic Bed Levelingthermal safety and superior movement management.
Clipper It makes use of a host-based strategy and relies on a single board laptop ( Raspberry Pi) performs the advanced calculations required for 3D printing, decreasing the load on the printer’s management board. This setup leads to smoother and sooner prints. Klipper helps the next options: Pressure forward, Ingress Shapingand a number of microcontroller configurations.
Repetier Firmware is understood for its effectivity and superior options. It helps a number of extruders, varied mattress leveling strategies, and detailed print settings. Repetier firmware is optimized for high-speed printing and provides a variety of customization choices, making it appropriate for learners and superior customers alike.
Creating 3D Print Recordsdata
- Acquire or develop a 3D mannequin of the merchandise you wish to print. Be sure that the wall thickness is acceptable for the printing course of. Verify for any tears or imperfections that will trigger the slice to fail. Moreover, examine if the dimensions of the thing is acceptable for the printer you might be utilizing.
- Use a suitably outfitted design software program or file converter to create one of many widespread file codecs accepted by your slicer. Widespread communication codecs to add to slicer software program are STL, OBJ, and VRML. Not all slicers can entry all file varieties. Be sure that the decision of the generated communication file is acceptable to your printer decision and the complexity of the half you might be printing.
- Add this communication file into the slicer software program for use. Carry out the slicing operation, ensuring that settings similar to scale, orientation, and slice thickness are set appropriately.
- The ensuing slice file is then uploaded by way of Wi-Fi, USB or SD card as considered one of a number of machine instruction information, normally in G-code format.
- Configure the printer to finish the duty in line with the uploaded G-code file and print the half.
I hope this helps. Thanks.
Additionally take a look at these articles: Printing Toys with the ToyBox 3D Printer, How Transistors Turn out to be a CPU, Ought to Children Study to Code?
This put up was sourced from all3dp.com
