


In fashionable improvement workflows, builders more and more depend on agentic coding assistants akin to Kiro Integrated Development Environment (IDE) to work together with distant instruments and providers. Nonetheless, organizations require sturdy authentication mechanisms to supply safe, identity-verified entry between these agentic coding assistants and enterprise Model Context Protocol (MCP) servers.
Amazon Bedrock AgentCore is a completely managed service that helps you deploy, handle, and scale AI brokers in manufacturing. Certainly one of its key parts, the AgentCore Gateway, offers a centralized entry level for routing and securing agent-to-tool communications. When an AI assistant makes a request to an MCP server by way of the Gateway, that request have to be verified earlier than it’s processed. This is named inbound authentication. Solely licensed customers and brokers can entry the instruments and providers uncovered by the MCP server. Organizations usually handle consumer identities by way of an identification supplier (IdP), akin to Okta, Microsoft Entra ID, or Amazon Cognito, which authenticates customers and points safety tokens that confirm who they’re.
This publish demonstrates how you can implement Open Authorization (OAuth) Code stream as an inbound authorization mechanism for MCP servers hosted on Amazon Bedrock AgentCore Gateway. By the tip of this information, you should have a production-ready setup the place every AI assistant request is authenticated with a sound consumer identification token issued out of your group’s identification supplier.
What you’ll study
- How auth code stream works with AgentCore Gateway as an MCP useful resource server.
- Step-by-step configuration of your group’s identification supplier.
- AgentCore Gateway inbound authentication setup.
- Integration with Kiro IDE purchasers.
Resolution overview
In an inbound authorization code stream OAuth setup, the AgentCore Gateway acts as an MCP useful resource server that requires a sound identification token earlier than permitting AI purchasers to entry any instruments.
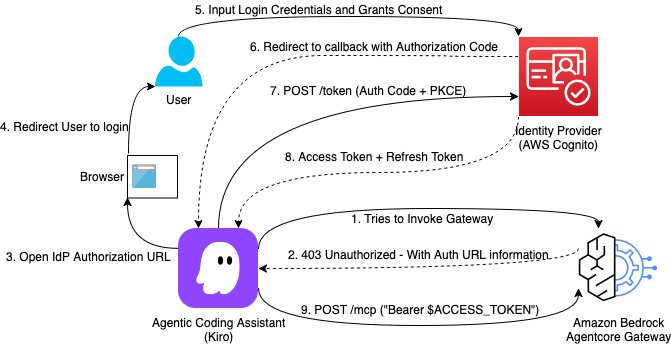
The next diagram exhibits the end-to-end structure for the authorization code stream with AgentCore Gateway, together with the identification supplier, AI shopper, and MCP server interactions.
Determine 1: Authorization code stream structure diagram.
Key parts
The answer includes the next parts working collectively to finish the authentication stream:
- Identification supplier (IdP): Manages consumer authentication and points tokens. The previous diagram references Amazon Cognito, however it may be your group’s IdP.
- Person: The top consumer who authenticates with the IdP and whose identification is verified for every request.
- Amazon Bedrock AgentCore Gateway: Acts because the OAuth useful resource server, validating tokens and proxying requests to MCP servers.
- Agentic coding assistant: Kiro IDE, which acts because the OAuth shopper and manages the authentication stream.
- MCP server: Your backend instruments and providers that the AI assistant must entry.
- MCP OAuth proxy (elective): Helps bridge the hole of spec standardization between agentic coding assistants, IdPs, and MCP servers. An MCP OAuth proxy brings standardization that helps the authorization code stream.
The inbound authorization code stream
This stream makes certain that each request that the AI assistant sends to the MCP server is authenticated with a sound identification token belonging to the consumer.
- MCP shopper connection – The agentic coding assistant (for instance, Kiro IDE) initiates a connection to the AgentCore Gateway’s MCP endpoint.
- Authentication problem – The Gateway detects that the request lacks a sound token and responds with an HTTP 401, together with a
www-authenticateheader pointing to the Gateway’s OAuth Protected Useful resource Metadata endpoint (.well-known/oauth-protected-resource). This follows the MCP specification’s Protected Resource Metadata (PRM) pattern. - Discovery – The MCP shopper fetches the Protected Useful resource Metadata from the Gateway, which returns the IdP’s authorization server discovery URL (for instance,
https://{yourIdPDomain}/oauth2/default/.well-known/openid-configuration). - Person redirection – The MCP shopper opens the consumer’s system browser and redirects to the IdP’s authorization endpoint with a PKCE problem, requesting the configured scopes (for instance,
openid profile e mail offline_access). - Person authentication and consent – The consumer enters their credentials on the IdP login web page. The IdP verifies the consumer’s identification and prompts for consent to authorize the appliance.
- Authorization code grant – After approval, the IdP redirects the consumer’s browser to the shopper’s native callback URL (managed by the shopper’s native listener) with an authorization code.
- Token change request – The MCP shopper sends the authorization code together with the PKCE code verifier to the IdP’s token endpoint.
- Token issuance – The IdP validates the authorization code and PKCE verifier, then returns an entry token (and optionally a refresh token) to the MCP shopper.
- Authenticated MCP request and validation – The MCP shopper consists of the entry token within the
Authorizationheader for all subsequent requests. The Gateway validates the token’s signature, expiration, issuer, and viewers or customized claims, then proxies the request to the goal MCP server for execution.
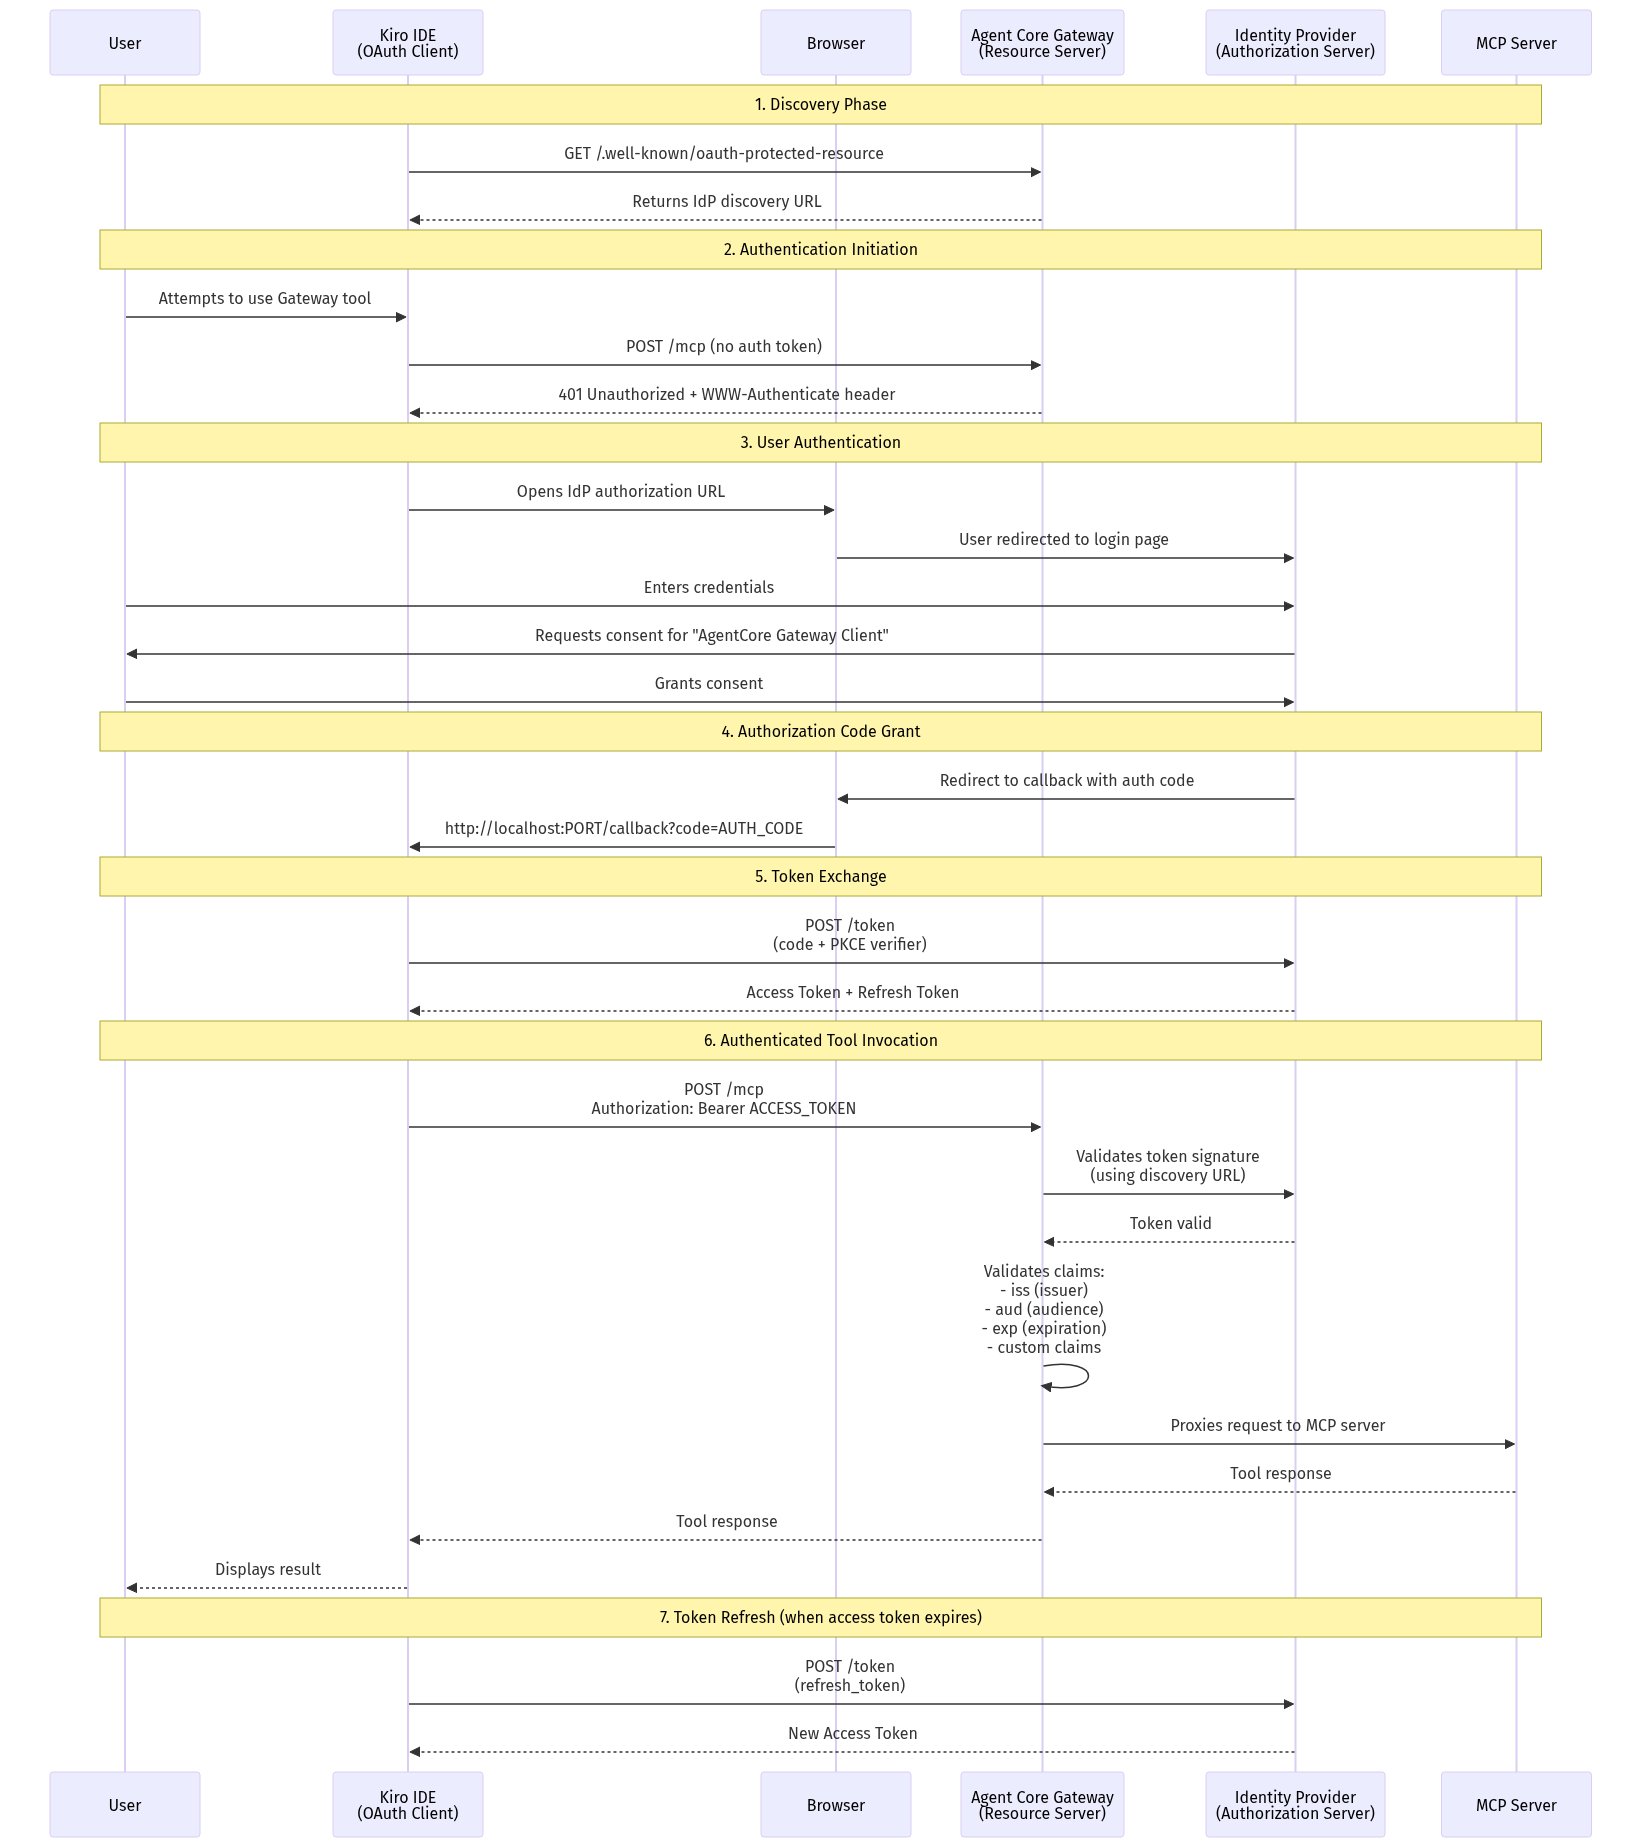
Determine 2: Authorization code stream request sequence.
Configuration overview
The next desk summarizes the required configuration for every part within the authorization code stream setup. Detailed step-by-step directions observe within the Technical implementation part.
| Part | Required configuration | |
| 1 | Identification supplier | Create an OpenID Join (OIDC) net utility with Authorization Code and Refresh Token grants enabled. |
| 2 | AgentCore Gateway | Set inbound authorization to JWT. Configure the invention URL to your IdP’s issuer (for instance, https://{yourIdPDomain}/oauth2/default/.well-known/openid-configuration). |
| 3 | Kiro IDE | Add the Gateway URL in Settings > Connectors (or by way of the CLI). The shopper mechanically triggers the OAuth stream if the Gateway returns a 401 Unauthorized with the proper auth headers. |
Technical implementation
With the structure and stream established, configure every part. This part offers step-by-step directions for the three parts referenced within the configuration overview desk:
- Identification supplier: Register an OIDC utility and configure grant sorts, redirect URIs, and token settings.
- AgentCore Gateway: Allow JWT-based inbound authorization and level it to your IdP’s discovery endpoint.
- MCP shopper (Kiro IDE): Join the shopper to the Gateway URL and confirm the end-to-end OAuth stream.
Conditions
You could have the next stipulations in place to observe alongside.
- An AWS account with AgentCore Gateway deployed.
- An identification supplier (IdP) with permissions to configure an app (for instance, Amazon Cognito, Okta, Auth0, or different enterprise identification suppliers).
- MCP OAuth proxy.
- Kiro IDE put in regionally.
- Fundamental understanding of OAuth 2.0 flows.
Step 1: Configure the group’s identification supplier
On this step, you register an OIDC utility along with your group’s identification supplier and configure it to assist the authorization code stream with PKCE.
1.1 Create an OIDC utility
Sign up to your IdP admin console and create a brand new OIDC/OAuth 2.0 utility integration:
- Signal-in methodology: OIDC.
- Software sort: Net utility.
- Title: AgentCore Gateway shopper (or your most popular title).
1.2 Configure grant sorts
Allow the next grant sorts:
- Authorization Code.
- Refresh Token.
1.3 Set redirect URIs
Add the callback URL that your AI shopper will use:
http://localhost:PORT/callbackExchange PORT with the port that your client uses.
1.4 Configure token settings
In your IdP utility settings, do the next.
Token lifetimes:
- Entry token lifetime: 1 hour (beneficial).
- Refresh token lifetime: 90 days (modify based mostly in your safety necessities).
- ID token lifetime: 1 hour.
1.5 Be aware your configuration
Save the next values. You have to them for Gateway configuration:
- Consumer ID: Discovered within the utility’s Basic tab (wanted for Kiro IDE shopper configuration).
- Issuer URL: Your IdP’s issuer URL (for instance,
https://{yourIdPDomain}/oauth2/default). - Discovery URL: Your IdP’s OpenID Join discovery endpoint (for instance,
https://{yourIdPDomain}/oauth2/default/.well-known/openid-configuration).
For this configuration:
- No shopper secret required – This stream makes use of PKCE (Proof Key for Code Trade), which is designed for public purchasers like desktop purposes. The shopper secret isn’t wanted or utilized by Kiro IDE.
- No IdP endpoints in shopper config – Kiro IDE discovers the OAuth endpoints mechanically from the Gateway, which returns the invention URL. You don’t configure IdP URLs immediately within the shopper.
Step 2: Configure AgentCore Gateway
Together with your identification supplier configured, the following step is to attach AgentCore Gateway to your IdP so it will probably validate incoming tokens.
2.1 Set inbound authorization mode
Configure your Gateway to make use of JWT-based authentication along with your IdP’s discovery endpoint:
2.2 Customized declare validation
AgentCore Gateway validates JWT tokens based mostly on customary OAuth 2.0 claims and helps customized declare validation to accommodate totally different IdP implementations. The Gateway expects tokens to include:
- Normal claims:
iss(issuer),aud(viewers),exp(expiration),iat(issued at),client_id(shopper identification), andscopes(allowed scopes). - Consumer identification: The Gateway can validate shopper identification by way of varied claims relying in your IdP.
Different IdPs may use totally different declare names for shopper identification, scopes, and so forth (for instance, cid, azp, scp). You possibly can configure customized declare validation in your Gateway to match your IdP’s token construction:
- Customized declare:
<claim-name> EQUALS <expected-value>(see AgentCore Gateway: Arrange a JWT). - Instance:
cid EQUALS 0oaz7147z771FZmdQ697(for IdPs that usecid, like Okta). - This validates that the token was issued in your particular utility.
Be aware: The Gateway’s Allowed viewers area may be stored empty when utilizing customized declare validation. The customized declare examine offers the required shopper identification verification.
2.3 Perceive Gateway token validation
Now that the Gateway is configured along with your IdP’s discovery URL and declare guidelines, have a look at the way it validates incoming tokens at runtime.
AgentCore Gateway is designed to be agnostic to how the OAuth token was obtained by the consumer. The Gateway doesn’t distinguish between tokens acquired by way of the next:
- Consumer credentials stream, the place the appliance authenticates immediately.
- Authorization code stream, the place the consumer explicitly authenticates and grants consent.
The Gateway solely requires that the OAuth token offered within the request is legitimate based mostly on the parameters configured throughout Gateway setup:
- Token signature: Verified towards the general public keys from the IdP’s discovery URL.
- Token expiration: Validates the token hasn’t expired.
- Issuer (
issdeclare): Matches the anticipated IdP issuer. - Viewers or customized claims: Validates the token was issued for this particular Gateway or utility.
- Normal OAuth claims: Checks required claims like
iat,exp, and so forth.
Whether or not customers acquire tokens by way of a shopper credentials stream, authorization code stream, or different OAuth grant sort, the Gateway treats all tokens equally. So long as the token passes the validation checks configured in your Gateway setup, the request is permitted. With this flexibility, you possibly can select the authentication stream that matches your use case whereas sustaining constant safety on the Gateway stage.
2.4 Confirm Gateway configuration
Take a look at that your Gateway endpoint is accessible and requires authentication:
The next response confirms that authentication is correctly configured (a 401 response to unauthenticated MCP requests):
# Anticipated response displaying authentication is required:
HTTP/2 401
www-authenticate: Bearer resource_metadata="https://<your-gateway-url>/.well-known/oauth-protected-resource"
{"jsonrpc":"2.0","id":0,"error":{"code":-32001,"message":"Lacking Bearer token"}}
Step 3: MCP OAuth proxy
For the aim of this publish, use mcp-remote to standardize the MCP shopper interface and full the authorization code stream.
3.1 Set up the mcp-remote package deal
Use mcp-remote to bridge Kiro IDE’s MCP shopper with the Gateway’s OAuth-protected endpoint.
Be aware: mcp-remote is a working proof-of-concept and needs to be thought-about experimental.
Step 4: Configure the AI shopper (Kiro IDE)
With the Gateway and MCP OAuth proxy configured, the ultimate configuration step is connecting your AI shopper to the Gateway endpoint. Kiro IDE handles the OAuth stream mechanically. When it receives a 401 problem from the Gateway, it initiates the authorization code stream along with your IdP.
4.1 Configure Kiro IDE
Add the Gateway to your MCP configuration file at ~/.kiro/settings/mcp.json:
Configuration parameters:
command: Usemcp-remoteto connect with distant MCP servers (mcp-remote).- First arg: Your Gateway URL with the
/mcppath. - Second arg: Native port for the OAuth callback (for instance,
3334). --static-oauth-client-info: JSON string containing:client_id: Your IdP utility shopper ID.redirect_uris: Should match the port specified within the second arg.scope: Embraceopenid profile e mail offline_accessfor fundamental auth.
4.2 Take a look at the authentication stream
After including the Gateway connection, confirm that the authentication stream completes efficiently:
- Restart your AI shopper.
- Try to make use of a device from the Gateway.
- You’re redirected to your browser for IdP login.
- After profitable authentication, the device runs.
Step 5: Confirm the end-to-end stream
In any case parts are configured and the preliminary authentication succeeds, confirm that the complete stream works end-to-end, from the AI shopper sending a device request, by way of token validation on the Gateway, to receiving a response from the MCP server.
5.1 Examine token validation
Monitor your Gateway logs to verify token validation:
# Instance log entry displaying profitable validation
[INFO] Token validated efficiently for consumer: consumer@instance.com
[INFO] Executing device: list_files
For a step-by-step walkthrough utilizing Okta because the IdP, see this GitHub repo.
Clear up
In the event you adopted together with this publish and need to undo the assets you created, full the next steps. They’re offered in reverse order of creation in order that dependent assets are eliminated earlier than the parts they depend on.
Revoke OAuth tokens
Earlier than eradicating any configuration, revoke any lively tokens issued throughout testing. Seek the advice of your IdP’s documentation for the precise revocation endpoint URL and supported parameters.
Key issues that modify by IdP:
- Revocation endpoint URL: Examine your IdP’s OpenID Join discovery doc (the
revocation_endpointarea). - Token sorts accepted: Some IdPs solely settle for refresh tokens. Others settle for each entry and refresh tokens.
- Consumer authentication: Public purchasers usually move
client_idwithin the physique. Confidential purchasers may require a Fundamental Authorization header with encoded credentials. - Cascade conduct: Revoking a refresh token often invalidates its related entry tokens, however verify along with your IdP.
You may also clear regionally cached tokens by eradicating the mcp-remote auth cache. On macOS or Linux:
Take away the AI shopper configuration (Kiro IDE)
Take away the Gateway entry out of your Kiro IDE MCP configuration at ~/.kiro/settings/mcp.json. Delete the gateway-tools server block you added in Step 4.
Take away the MCP OAuth proxy
Uninstall the mcp-remote package deal you put in in Step 3:
Delete the AgentCore Gateway configuration
Take away the inbound authentication configuration you arrange in Step 2, or delete the Gateway completely in case you created it solely for this walkthrough:
Possibility A: Take away inbound auth (maintain the Gateway)
Possibility B: Delete the Gateway
Take away the group’s identification supplier configuration
Delete the OIDC utility integration you created in Step 1:
- Sign up to your IdP admin console.
- Navigate to Functions > Functions.
- Choose the appliance you created (for instance, “AgentCore Gateway shopper”).
- Deactivate the appliance first (if required by your IdP), then delete it.
This revokes all shopper credentials and prevents any future token issuance for this utility.
Conclusion
On this publish, you discovered how you can implement safe, identity-verified entry to MCP servers hosted on Amazon Bedrock AgentCore Gateway utilizing inbound authorization code stream. With this setup, each AI assistant request is authenticated with a sound consumer token out of your group’s identification supplier.
Key takeaways
- Authorization code stream offers robust authentication by requiring consumer consent and identification verification.
- AgentCore Gateway acts as an OAuth useful resource server, validating tokens earlier than permitting requests to invoke targets.
- The stream is clear to finish customers. They authenticate as soon as, and tokens are mechanically refreshed.
- This structure scales to assist a number of AI purchasers and identification suppliers.
Extra assets
Concerning the authors
