


In at the moment’s data-intensive enterprise panorama, organizations face the problem of extracting invaluable insights from numerous information sources scattered throughout their infrastructure. Whether or not it’s structured information in databases or unstructured content material in doc repositories, enterprises usually battle to effectively question and use this wealth of knowledge.
On this put up, we discover how you should use Amazon Q Enterprise, the AWS generative AI-powered assistant, to construct a centralized information base on your group, unifying structured and unstructured datasets from totally different sources to speed up decision-making and drive productiveness. The answer combines information from an Amazon Aurora MySQL-Suitable Version database and information saved in an Amazon Easy Storage Service (Amazon S3) bucket.
Resolution overview
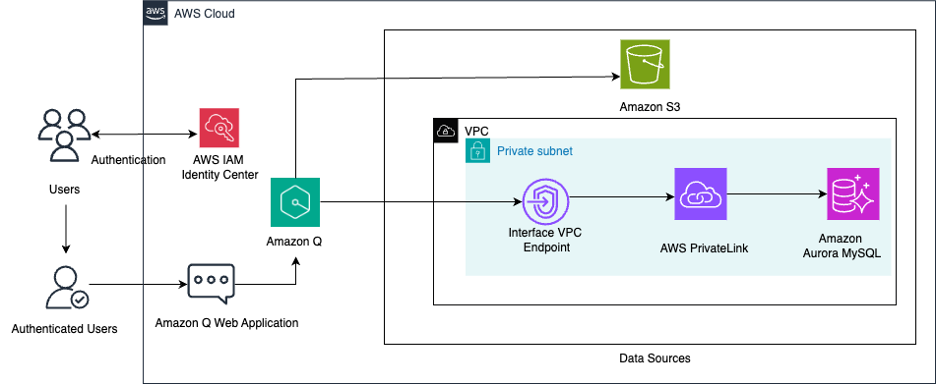
Amazon Q Enterprise is a completely managed, generative AI-powered assistant that helps enterprises unlock the worth of their information and information. The important thing to utilizing the complete potential of Amazon Q lies in its potential to seamlessly combine and question a number of information sources, from structured databases to unstructured content material shops. On this answer, we use Amazon Q to construct a complete information base that mixes sales-related information from an Aurora MySQL database and gross sales paperwork saved in an S3 bucket. Aurora MySQL-Suitable is a completely managed, MySQL-compatible, relational database engine that mixes the velocity and reliability of high-end industrial databases with the simplicity and cost-effectiveness of open-source databases. Amazon S3 is an object storage service that provides industry-leading scalability, information availability, safety, and efficiency.
This tradition information base that connects these numerous information sources permits Amazon Q to seamlessly reply to a variety of sales-related questions utilizing the chat interface. The next diagram illustrates the answer structure.
Stipulations
For this walkthrough, it’s best to have the next conditions:
Arrange your VPC
Establishing a VPC gives a safe, remoted community atmosphere for internet hosting the information sources that Amazon Q Enterprise will entry to index. On this put up, we use an Aurora MySQL database in a personal subnet, and Amazon Q Enterprise accesses the personal DB occasion in a safe method utilizing an interface VPC endpoint.
Full the next steps:
- Select an AWS Area Amazon Q helps (for this put up, we use the us-east-1 Area).
- Create a VPC or use an current VPC with a minimum of two subnets. These subnets should be in two totally different Availability Zones within the Area the place you need to deploy your DB occasion.
- Check with Steps 1 and a pair of in Configuring Amazon VPC assist for Amazon Q Enterprise connectors to configure your VPC so that you’ve a personal subnet to host an Aurora MySQL database together with a safety group on your database.
- Moreover, create a public subnet that may host an EC2 bastion server, which we create within the subsequent steps.
- Create an interface VPC endpoint for Aurora powered by AWS PrivateLink within the VPC you created. For directions, seek advice from Entry an AWS service utilizing an interface VPC endpoint.
- Specify the personal subnet the place the Aurora MySQL database resides together with the database safety group you created.
Every interface endpoint is represented by a number of elastic community interfaces in your subnets, which is then utilized by Amazon Q Enterprise to hook up with the personal database.
Arrange an Aurora MySQL database
Full the next steps to create an Aurora MySQL database to host the structured gross sales information:
- On the Amazon RDS console, select Databases within the navigation pane.
- Select Create database.
- Choose Aurora, then Aurora (MySQL appropriate).
- For Templates, select Manufacturing or Dev/take a look at.
- Underneath Settings, enter a reputation on your database cluster identifier. For instance, q-aurora-mysql-source.
- For Credentials settings, select Self-managed, give the admin consumer a password, and hold the remainder of the parameters as default.
- Underneath Connectivity, for Digital personal cloud (VPC), select the VPC that you just created.
- For DB subnet group, create a brand new subnet group or select an current one. Preserve the remainder of the parameters as default.
- For Publicly accessible, select NO.
- Underneath VPC safety group (firewall), select Current and select the present safety group that you just created for the Aurora MySQL DB occasion.
- Depart the remaining parameters as default and create the database.
Create an EC2 bastion host to hook up with the personal Aurora MySQL DB occasion
On this put up, you connect with the personal DB occasion from the MySQL Workbench shopper in your native machine by way of an EC2 bastion host. Launch the EC2 occasion within the public subnet of the VPC you configured. The safety group connected to this EC2 bastion host occasion needs to be configured to permit SSH visitors (port 22) out of your native machine’s IP handle. To facilitate the connection between the EC2 bastion host and the Aurora MySQL database, the safety group for the Aurora MySQL database ought to have an inbound rule to permit MySQL visitors (port 3306) from the safety group of the EC2 bastion host. Conversely, the safety group for the EC2 bastion host ought to have an outbound rule to permit visitors to the safety group of the Aurora MySQL database on port 3306. Check with Controlling entry with safety teams for extra particulars.
Configure IAM Id Heart
An Amazon Q Enterprise utility requires you to make use of IAM Id Heart to handle consumer entry. IAM Id Heart is a single place the place you may assign your workforce customers, often known as workforce identities, to offer constant entry to a number of AWS accounts and functions. On this put up, we use IAM Id Heart because the SAML 2.0-aligned identification supplier (IdP). Ensure you have enabled an IAM Id Heart occasion, provisioned a minimum of one consumer, and offered every consumer with a sound e-mail handle. The Amazon Q Enterprise utility must be in the identical Area because the IAM Id Heart occasion. For extra info on enabling customers in IAM Id Heart, see Add customers to your Id Heart listing.
Create an S3 bucket
Create a S3 bucket within the us-east-1 Area with the default settings and create a folder with a reputation of your selection contained in the bucket.
Create and cargo pattern information
On this put up, we use two pattern datasets: a total sales dataset CSV file and a sales target document in PDF format. The overall gross sales dataset comprises details about orders positioned by clients situated in numerous geographical places, by way of totally different gross sales channels. The gross sales doc comprises details about gross sales targets for the yr for every of the gross sales channel. Full the steps within the part under to load each datasets.
Aurora MySQL database
Within the Amazon Q Enterprise utility, you create two indexes for a similar Aurora MySQL desk: one on the full gross sales dataset and one other on an aggregated view of the full gross sales information, to cater to the totally different kind of queries. Full the next steps:
- Securely connect to your personal Aurora MySQL database utilizing an SSH tunnel by way of an EC2 bastion host.
This lets you handle and work together together with your database assets immediately out of your native MySQL Workbench shopper.
- Create the database and tables utilizing the next instructions on the native MySQL Workbench shopper:
- Obtain the pattern file csv in your native atmosphere.
- Use the next code to insert pattern information in your MYSQL shopper:
When you encounter the error LOAD DATA LOCAL INFILE file request rejected on account of restrictions on entry when operating the statements in MySQL Workbench 8.0, you may must edit the connection. On the Connection tab, go to the Superior sub-tab, and within the Others subject, add the road OPT_LOCAL_INFILE=1 and begin a brand new question tab after testing the connection.
- Confirm the information load by operating a choose assertion:
This could return 7,991 rows.
The next screenshot reveals the database desk schema and the pattern information within the desk.

Amazon S3 bucket
Obtain the pattern file 2020_Sales_Target.pdf in your native atmosphere and add it to the S3 bucket you created. This gross sales goal doc comprises details about the gross sales goal for 4 gross sales channels and appears like the next screenshot.

Create an Amazon Q utility
Full the next steps to create an Amazon Q utility:
- On the Amazon Q console, select Functions within the navigation pane.
- Select Create utility.
- Present the next particulars:
- Within the Software particulars part, for Software title, enter a reputation for the applying (for instance,
sales_analyzer). - Within the Service entry part, for Select a way to authorize Amazon Q, choose Create and use a brand new service position.
- Depart all different default choices and select Create.
- Within the Software particulars part, for Software title, enter a reputation for the applying (for instance,

- On the Choose retriever web page, you configure the retriever. The retriever is an index that shall be utilized by Amazon Q to fetch information in actual time.
- For Retrievers, choose Use native retriever.
- For Index provisioning, choose Starter.
- For Variety of models, use the default worth of 1. Every unit can assist as much as 20,000 paperwork. For a database, every database row is taken into account a doc.
- Select Subsequent.

Configure Amazon Q to hook up with Aurora MySQL-Suitable
Full the next steps to configure Amazon Q to hook up with Aurora MySQL-Suitable:
- On the Join information sources web page, below Information sources, select the Aurora (MySQL) information supply.
- Select Subsequent.

- Within the Identify and outline part, configure the next parameters:
- For Information supply title, enter a reputation (for instance,
aurora_mysql_sales). - For Description, enter an outline.
- For Information supply title, enter a reputation (for instance,
- Within the Supply part, configure the next parameters:
- For Host, enter the database endpoint (for instance,
<databasename>.<ID>.<area>.rds.amazonaws.com).
- For Host, enter the database endpoint (for instance,
You possibly can acquire the endpoint on the Amazon RDS console for the occasion on the Connectivity & safety tab.
-
- For Port, enter the Amazon RDS port for MySQL:
3306. - For Occasion, enter the database title (for instance,
gross sales). - Choose Allow SSL Certificates location.
- For Port, enter the Amazon RDS port for MySQL:

- For Authentication, select Create a brand new secret with a reputation of your selection.
- Present the consumer title and password on your MySQL database to create the key.
- Within the Configure VPC and safety group part, select the VPC and subnets the place your Aurora MySQL database is situated, and select the default VPC safety group.

- For IAM position, select Create a brand new service position.
- For Sync scope, below SQL question, enter the next question:
This choose assertion returns a major key column, a doc title column, and a textual content column that serves your doc physique for Amazon Q to reply questions. Ensure you don’t put ; on the finish of the question.
- For Main key column, enter
order_number. - For Title column, enter
sales_channel. - For Physique column, enter
sales_details.

- Underneath Sync run schedule, for Frequency, select Run on demand.
- Preserve all different parameters as default and select Add information supply.

This course of might take a couple of minutes to finish. After the aurora_mysql_sales information supply is added, you’ll be redirected to the Join information sources web page.
- Repeat the steps so as to add one other Aurora MySQL information supply, known as
aggregated_sales, for a similar database however with the next particulars within the Sync scope This information supply shall be utilized by Amazon Q for answering questions on aggregated gross sales.- Use the next SQL question:
-
- For Main key column, enter
scoy_id. - For Title column, enter
sales_channel. - For Physique column, enter
sales_aggregates.
- For Main key column, enter

After including the aggregated_sales information supply, you’ll be redirected to the Join information sources web page once more.
Configure Amazon Q to hook up with Amazon S3
Full the next steps to configure Amazon Q to hook up with Amazon S3:
- On the Join information sources web page, below Information sources, select Amazon S3.
- Underneath Identify and outline, enter an information supply title (for instance,
s3_sales_targets) and an outline. - Underneath Configure VPC and safety group settings, select No VPC.

- For IAM position, select Create a brand new service position.
- Underneath Sync scope, for the information supply location, enter the S3 bucket title containing the gross sales goal PDF doc.
- Depart all different parameters as default.

- Underneath Sync run schedule, for Frequency, select Run on demand.
- Select Add information supply.

- On the Join information sources web page, select Subsequent.
- Within the Replace teams and customers part, select Add customers and teams.
- Select the consumer as entered in IAM Id Heart and select Assign.

- After you add the consumer, you may select the Amazon Q Enterprise subscription to assign to the consumer. For this put up, we select Q Enterprise Lite.
- Underneath Net expertise service entry, choose Create and use a brand new service position and enter a service position title.
- Select Create utility.

After couple of minutes, the applying shall be created and you’ll be taken to the Functions web page on the Amazon Q Enterprise console.

Sync the information sources
Select the title of your utility and navigate to the Information sources part. For every of the three information sources, choose the information supply and select Sync now. It’s going to take a number of minutes to finish. After the sources have synced, it’s best to see the Final sync standing present as Accomplished.

Customise and work together with the Amazon Q utility
At this level, you’ve created an Amazon Q utility, synced the information supply, and deployed the net expertise. You possibly can customise your net expertise to make it extra intuitive to your utility customers.
- On the applying particulars web page, select Customise net expertise.

- For this put up, we have now custom-made the Title, Subtitle and Welcome message fields for our assistant.

- After you’ve accomplished your customizations for the net expertise, return to the applying particulars web page and select the net expertise URL.
- Register with the IAM Id Heart consumer title and password you created earlier to begin the dialog with assistant.

Now you can take a look at the applying by asking totally different questions, as proven within the following screenshot. You possibly can observe within the following query that the channel names had been fetched from the Amazon S3 gross sales goal PDF.

The next screenshots present extra instance interactions.


The reply within the previous instance was derived from the 2 sources: the S3 bucket and the Aurora database. You possibly can confirm the output by cross-referencing the PDF, which has a goal as $12 million for the in-store gross sales channel in 2020. The next SQL reveals the precise gross sales achieved in 2020 for a similar channel:

As seen from the gross sales goal PDF information, the 2020 gross sales goal for the distributor gross sales channel was $7 million.

The next SQL within the Aurora MySQL database reveals the precise gross sales achieved in 2020 for a similar channel:

The next screenshots present further questions.


You possibly can confirm the previous solutions with the next SQL:

Clear up
To keep away from incurring future prices, clear up any assets you created as a part of this answer, together with the Amazon Q Enterprise utility:
- On the Amazon Q Enterprise console, select Functions within the navigation pane, choose the applying you created, and on the Actions menu, select Delete.
- Delete the AWS Id and Entry Administration (IAM) roles created for the applying and information retriever. You possibly can determine the IAM roles utilized by the Amazon Q Enterprise utility and information retriever by inspecting the related configuration utilizing the AWS console or AWS Command Line Interface (AWS CLI).
- Delete the IAM Id Heart occasion you created for this walkthrough.
- Empty the bucket you created after which delete the bucket.
- Delete the Aurora MySQL occasion and Aurora cluster.
- Shut down the EC2 bastion host occasion.
- Delete the VPC and associated parts—the NAT gateway and interface VPC endpoint.
Conclusion
On this put up, we demonstrated how organizations can use Amazon Q to construct a unified information base that integrates structured information from an Aurora MySQL database and unstructured information from an S3 bucket. By connecting these disparate information sources, Amazon Q lets you seamlessly question info from two information sources and achieve invaluable insights that drive higher decision-making.
We encourage you to do this answer and share your expertise within the feedback. Moreover, you may discover the various different information sources that Amazon Q for Enterprise can seamlessly combine with, empowering you to construct sturdy and insightful functions.
In regards to the Authors
 Monjumi Sarma is a Technical Account Supervisor at Amazon Net Companies. She helps clients architect fashionable, scalable, and cost-effective options on AWS, which supplies them an accelerated path in direction of modernization initiatives. She has expertise throughout analytics, massive information, ETL, cloud operations, and cloud infrastructure administration.
 Akchhaya Sharma is a Sr. Information Engineer at Amazon Advertisements. He builds and manages data-driven options for advice techniques, working along with a various and proficient workforce of scientists, engineers, and product managers. He has expertise throughout analytics, massive information, and ETL.
