


Amazon SageMaker HyperPod is designed to help large-scale machine studying (ML) operations, offering a sturdy setting for coaching basis fashions (FMs) over prolonged durations. A number of customers — comparable to ML researchers, software program engineers, knowledge scientists, and cluster directors — can work concurrently on the identical cluster, every managing their very own jobs and recordsdata with out interfering with others.
When utilizing HyperPod, you should utilize acquainted orchestration choices comparable to Slurm or Amazon Elastic Kubernetes Service (Amazon EKS). This weblog put up particularly applies to HyperPod clusters utilizing Slurm because the orchestrator. In these clusters, the idea of login nodes is offered, which cluster directors can add to facilitate person entry. These login nodes function the entry level via which customers work together with the cluster’s computational sources. Through the use of login nodes, customers can separate their interactive actions, comparable to looking recordsdata, submitting jobs, and compiling code, from the cluster’s head node. This separation helps forestall any single person’s actions from affecting the general efficiency of the cluster.
Nevertheless, though HyperPod gives the aptitude to make use of login nodes, it doesn’t present an built-in mechanism for load balancing person exercise throughout these nodes. Consequently, customers manually choose a login node, which might result in imbalances the place some nodes are overutilized whereas others stay underutilized. This not solely impacts the effectivity of useful resource utilization however can even result in uneven efficiency experiences for various customers.
On this put up, we discover an answer for implementing load balancing throughout login nodes in Slurm-based HyperPod clusters. By distributing person exercise evenly throughout all obtainable nodes, this method gives extra constant efficiency, higher useful resource utilization, and a smoother expertise for all customers. We information you thru the setup course of, offering sensible steps to realize efficient load balancing in your HyperPod clusters.
Answer overview
In HyperPod, login nodes function entry factors for customers to work together with the cluster’s computational sources to allow them to handle their duties with out impacting the top node. Though the default technique for accessing these login nodes is thru AWS Methods Supervisor, there are instances the place direct Safe Shell (SSH) entry is extra appropriate. SSH gives a extra conventional and versatile approach of managing interactions, particularly for customers who require particular networking configurations or want options comparable to TCP load balancing, which Methods Supervisor doesn’t help.
On condition that HyperPod is usually deployed in a digital non-public cloud (VPC) utilizing non-public subnets, direct SSH entry to the login nodes requires safe community connectivity into the non-public subnet. There are a number of choices to realize this:
- AWS Website-to-Website VPN – Establishes a safe connection between your on-premises community and your VPC, appropriate for enterprise environments
- AWS Direct Join – Gives a devoted community connection for high-throughput and low-latency wants
- AWS VPN Shopper – A software-based resolution that distant customers can use to securely hook up with the VPC, offering versatile and quick access to the login nodes
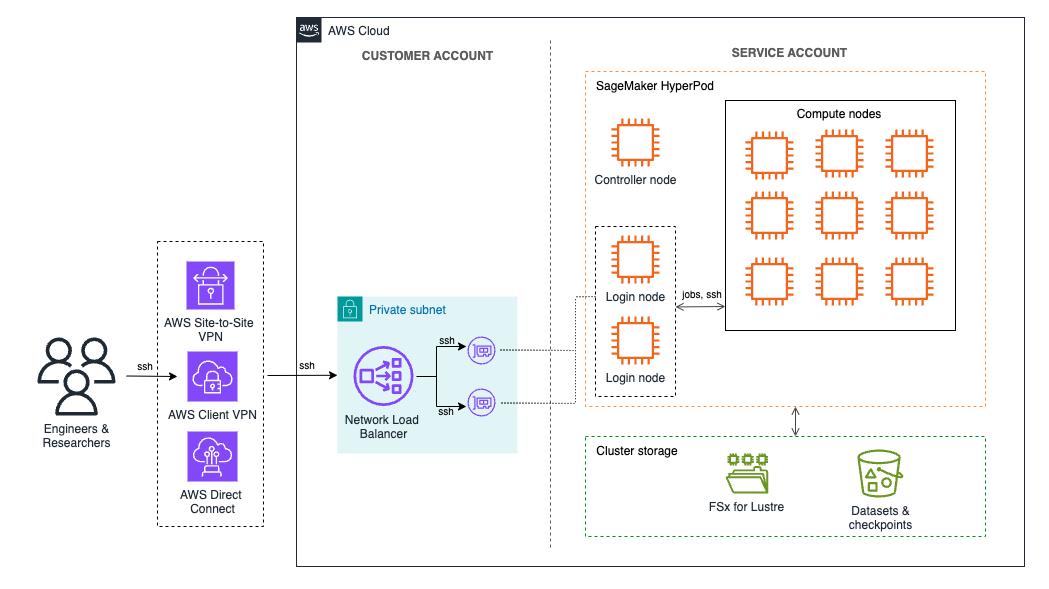
This put up demonstrates find out how to use the AWS VPN Shopper to determine a safe connection to the VPC. We arrange a Community Load Balancer (NLB) inside the non-public subnet to evenly distribute SSH visitors throughout the obtainable login nodes and use the VPN connection to connect with the NLB within the VPC. The NLB ensures that person classes are balanced throughout the nodes, stopping any single node from changing into a bottleneck and thereby enhancing general efficiency and useful resource utilization.
For environments the place VPN connectivity may not be possible, an alternate possibility is to deploy the NLB in a public subnet to permit direct SSH entry from the web. On this configuration, the NLB will be secured by proscribing entry via a safety group that enables SSH visitors solely from specified, trusted IP addresses. Consequently, approved customers can join on to the login nodes whereas sustaining some stage of management over entry to the cluster. Nevertheless, this public-facing technique is exterior the scope of this put up and isn’t beneficial for manufacturing environments, as exposing SSH entry to the web can introduce further safety dangers.
The next diagram gives an outline of the answer structure.
Conditions
Earlier than following the steps on this put up, ensure you have the foundational elements of a HyperPod cluster setup in place. This consists of the core infrastructure for the HyperPod cluster and the community configuration required for safe entry. Particularly, you want:
- HyperPod cluster – This put up assumes you have already got a HyperPod cluster deployed. If not, check with Getting began with SageMaker HyperPod and the HyperPod workshop for steerage on creating and configuring your cluster.
- VPC, subnets, and safety group – Your HyperPod cluster ought to reside inside a VPC with related subnets. To deploy a brand new VPC and subnets, comply with the directions within the Own Account part of the HyperPod workshop. This course of consists of deploying an AWS CloudFormation stack to create important sources such because the VPC, subnets, safety group, and an Amazon FSx for Lustre quantity for shared storage.
Establishing login nodes for cluster entry
Login nodes are devoted entry factors that customers can use to work together with the HyperPod cluster’s computational sources with out impacting the top node. By connecting via login nodes, customers can browse recordsdata, submit jobs, and compile code independently, selling a extra organized and environment friendly use of the cluster’s sources.
If you happen to haven’t arrange login nodes but, check with the Login Node part of the HyperPod Workshop, which gives detailed directions on including these nodes to your cluster configuration.
Every login node in a HyperPod cluster has an related community interface inside your VPC. A community interface, also called an elastic community interface, represents a digital community card that connects every login node to your VPC, permitting it to speak over the community. These interfaces have assigned IPv4 addresses, that are important for routing visitors from the NLB to the login nodes.
To proceed with the load balancer setup, you’ll want to get hold of the IPv4 addresses of every login node. You’ll be able to get hold of these addresses from the AWS Administration Console or by invoking a command in your HyperPod cluster’s head node.
Utilizing the AWS Administration Console
To arrange login nodes for cluster entry utilizing the AWS Administration Console, comply with these steps:
- On the Amazon EC2 console, choose Community interfaces within the navigation pane
- Within the Search bar, choose VPC ID = (Equals) and select the VPC id of the VPC containing the HyperPod cluster
- Within the Search bar, choose Description : (Comprises) and enter the identify of the occasion group that features your login nodes (sometimes, that is login-group)
For every login node, you will see an entry within the listing, as proven within the following screenshot. Be aware down the IPv4 addresses for all login nodes of your cluster.

Utilizing the HyperPod head node
Alternatively, you may as well retrieve the IPv4 addresses by coming into the next command in your HyperPod cluster’s head node:
Create a Community Load Balancer
The following step is to create a NLB to handle visitors throughout your cluster’s login nodes.
For the NLB deployment, you want the IPv4 addresses of the login nodes collected earlier and the suitable safety group configurations. If you happen to deployed your cluster utilizing the HyperPod workshop directions, a safety group that allows communication between all cluster nodes ought to already be in place.
This safety group will be utilized to the load balancer, as demonstrated within the following directions. Alternatively, you possibly can choose to create a devoted safety group that grants entry particularly to the login nodes.
Create goal group
First, we create the goal group that might be utilized by the NLB.
- On the Amazon EC2 console, choose Goal teams within the navigation pane
- Select Create goal group
- Create a goal group with the next parameters:
- For Select a goal kind, select IP addresses
- For Goal group identify, enter smhp-login-node-tg
- For Protocol : Port, select TCP and enter 22
- For IP deal with kind, select IPv4
- For VPC, select SageMaker HyperPod VPC (which was created with the CloudFormation template)
- For Well being verify protocol, select TCP
- Select Subsequent, as proven within the following screenshot

- Within the Register targets part, register the login node IP addresses because the targets
- For Ports, enter 22 and select Embrace as pending under, as proven within the following screenshot

- The login node IPs will seem as targets with Pending well being standing. Select Create goal group, as proven within the following screenshot

Create load balancer
To create the load balancer, comply with these steps:
- On the Amazon EC2 console, choose Load Balancers within the navigation pane
- Select Create load balancer
- Select Community Load Balancer and select Create, as proven within the following screenshot

- Present a reputation (for instance, smhp-login-node-lb) and select Inside as Scheme

- For community mapping, choose the VPC that comprises your HyperPod cluster and an related non-public subnet, as proven within the following screenshot

- Choose a safety group that enables entry on port 22 to the login nodes. If you happen to deployed your cluster utilizing the HyperPod workshop directions, you should utilize the safety group from this deployment.
- Choose the Goal group that you just created earlier than and select TCP as Protocol and 22 for Port, as proven within the following screenshot

- Select Create load balancer
After the load balancer has been created, you will discover its DNS identify on the load balancer’s element web page, as proven within the following screenshot.

Ensuring host keys are constant throughout login nodes
When utilizing a number of login nodes in a load-balanced setting, it’s essential to keep up constant SSH host keys throughout all nodes. SSH host keys are distinctive identifiers that every server makes use of to show its id to connecting shoppers. If every login node has a distinct host key, customers will encounter “WARNING: SSH HOST KEY CHANGED” messages every time they hook up with a distinct node, inflicting confusion and probably main customers to query the safety of the connection.
To keep away from these warnings, configure the identical SSH host keys on all login nodes within the load balancing rotation. This setup makes certain that customers gained’t obtain host key mismatch alerts when routed to a distinct node by the load balancer.
You’ll be able to enter the next script on the cluster’s head node to repeat the SSH host keys from the primary login node to the opposite login nodes in your HyperPod cluster:
Create AWS Shopper VPN endpoint
As a result of the NLB has been created with Inside scheme, it’s solely accessible from inside the HyperPod VPC. To entry the VPC and ship requests to the NLB, we use AWS Shopper VPN on this put up.
AWS Shopper VPN is a managed client-based VPN service that allows safe entry to your AWS sources and sources in your on-premises community.
We’ll arrange an AWS Shopper VPN endpoint that gives shoppers with entry to the HyperPod VPC and makes use of mutual authentication. With mutual authentication, Shopper VPN makes use of certificates to carry out authentication between shoppers and the Shopper VPN endpoint.
To deploy a consumer VPN endpoint with mutual authentication, you possibly can comply with the steps outlined in Get began with AWS Shopper VPN. When configuring the consumer VPN to entry the HyperPod VPC and the login nodes, preserve these variations to the next steps in thoughts:
- Step 2 (create a Shopper VPN endpoint) – By default, all consumer visitors is routed via the Shopper VPN tunnel. To permit web entry with out routing visitors via the VPN, you possibly can allow the choice Allow split-tunnel when creating the endpoint. When this feature is enabled, solely visitors destined for networks matching a route within the Shopper VPN endpoint route desk is routed via the VPN tunnel. For extra particulars, check with Cut up-tunnel on Shopper VPN endpoints.
- Step 3 (goal community associations) – Choose the VPC and personal subnet utilized by your HyperPod cluster, which comprises the cluster login nodes.
- Step 4 (authorization guidelines) – Select the Classless Inter-Area Routing (CIDR) vary related to the HyperPod VPC. If you happen to adopted the HyperPod workshop directions, the CIDR vary is 10.0.0.0/16.
- Step 6 (safety teams) – Choose the safety group that you just beforehand used when creating the NLB.
Connecting to the login nodes
After the AWS Shopper VPN is configured, shoppers can set up a VPN connection to the HyperPod VPC. With the VPN connection in place, shoppers can use SSH to connect with the NLB, which is able to route them to one of many login nodes.
ssh -i /path/to/your/private-key.pem person@<NLB-IP-or-DNS>
To permit SSH entry to the login nodes, you need to create person accounts on the cluster and add their public keys to the authorized_keys file on every login node (or on all nodes, if crucial). For detailed directions on managing multi-user entry, check with the Multi-User part of the HyperPod workshop.
Along with utilizing the AWS Shopper VPN, you may as well entry the NLB from different AWS providers, comparable to Amazon Elastic Compute Cloud (Amazon EC2) situations, in the event that they meet the next necessities:
- VPC connectivity – The EC2 situations have to be both in the identical VPC because the NLB or in a position to entry the HyperPod VPC via a peering connection or comparable community setup.
- Safety group configuration – The EC2 occasion’s safety group should enable outbound connections on port 22 to the NLB safety group. Likewise, the NLB safety group ought to be configured to simply accept inbound SSH visitors on port 22 from the EC2 occasion’s safety group.
Clear up
To take away deployed sources, you possibly can clear them up within the following order:
- Delete the Shopper VPN endpoint
- Delete the Community Load Balancer
- Delete the goal group related to the load balancer
If you happen to additionally need to delete the HyperPod cluster, comply with these further steps:
- Delete the HyperPod cluster
- Delete the CloudFormation stack, which incorporates the VPC, subnets, safety group, and FSx for Lustre quantity
Conclusion
On this put up, we explored find out how to implement login node load balancing for SageMaker HyperPod clusters. Through the use of a Community Load Balancer to distribute person visitors throughout login nodes, you possibly can optimize useful resource utilization and improve the general multi-user expertise, offering seamless entry to cluster sources for every person.
This method represents just one option to customise your HyperPod cluster. Due to the pliability of SageMaker HyperPod you possibly can adapt configurations to your distinctive wants whereas benefiting from a managed, resilient setting. Whether or not you’ll want to scale basis mannequin workloads, share compute sources throughout totally different duties, or help long-running coaching jobs, SageMaker HyperPod affords a flexible resolution that may evolve along with your necessities.
For extra particulars on benefiting from SageMaker HyperPod, dive into the HyperPod workshop and discover additional weblog posts protecting HyperPod.
In regards to the Authors
 Janosch Woschitz is a Senior Options Architect at AWS, specializing in AI/ML. With over 15 years of expertise, he helps clients globally in leveraging AI and ML for revolutionary options and constructing ML platforms on AWS. His experience spans machine studying, knowledge engineering, and scalable distributed methods, augmented by a robust background in software program engineering and business experience in domains comparable to autonomous driving.
 Giuseppe Angelo Porcelli is a Principal Machine Studying Specialist Options Architect for Amazon Net Companies. With a number of years of software program engineering and an ML background, he works with clients of any dimension to grasp their enterprise and technical wants and design AI and ML options that make the very best use of the AWS Cloud and the Amazon Machine Studying stack. He has labored on tasks in numerous domains, together with MLOps, laptop imaginative and prescient, and NLP, involving a broad set of AWS providers. In his free time, Giuseppe enjoys enjoying soccer.
