


What do all microcontrollers (MCUs) have in frequent?
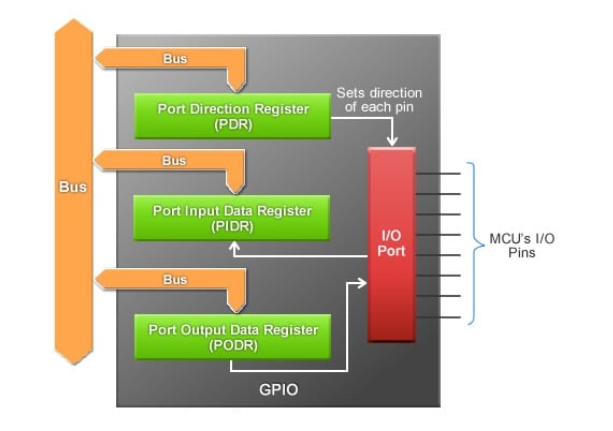
Comes with a pin. A pin is a pin that stands out from an IC chip. Every pin has a selected perform or process, however relying in your necessities, a pin could solely be used as a general-purpose enter or output. These pins are internally related to registers (multiple per pin), however not all pins have to have registers. Some pins (assuming they aren’t dual-purpose pins), reminiscent of VCC, GND, CLK, and RESET pins, should not have related registers, and all enter/output (IO) pins are sometimes related to a number of registers.
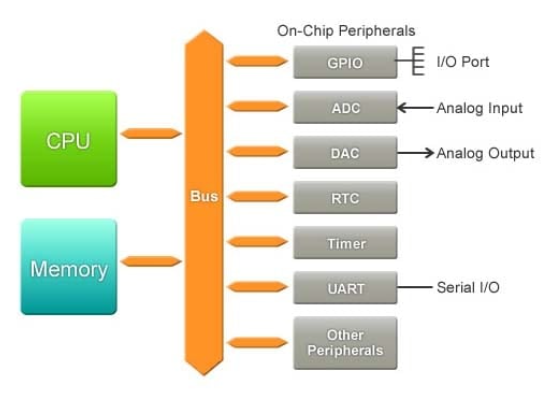
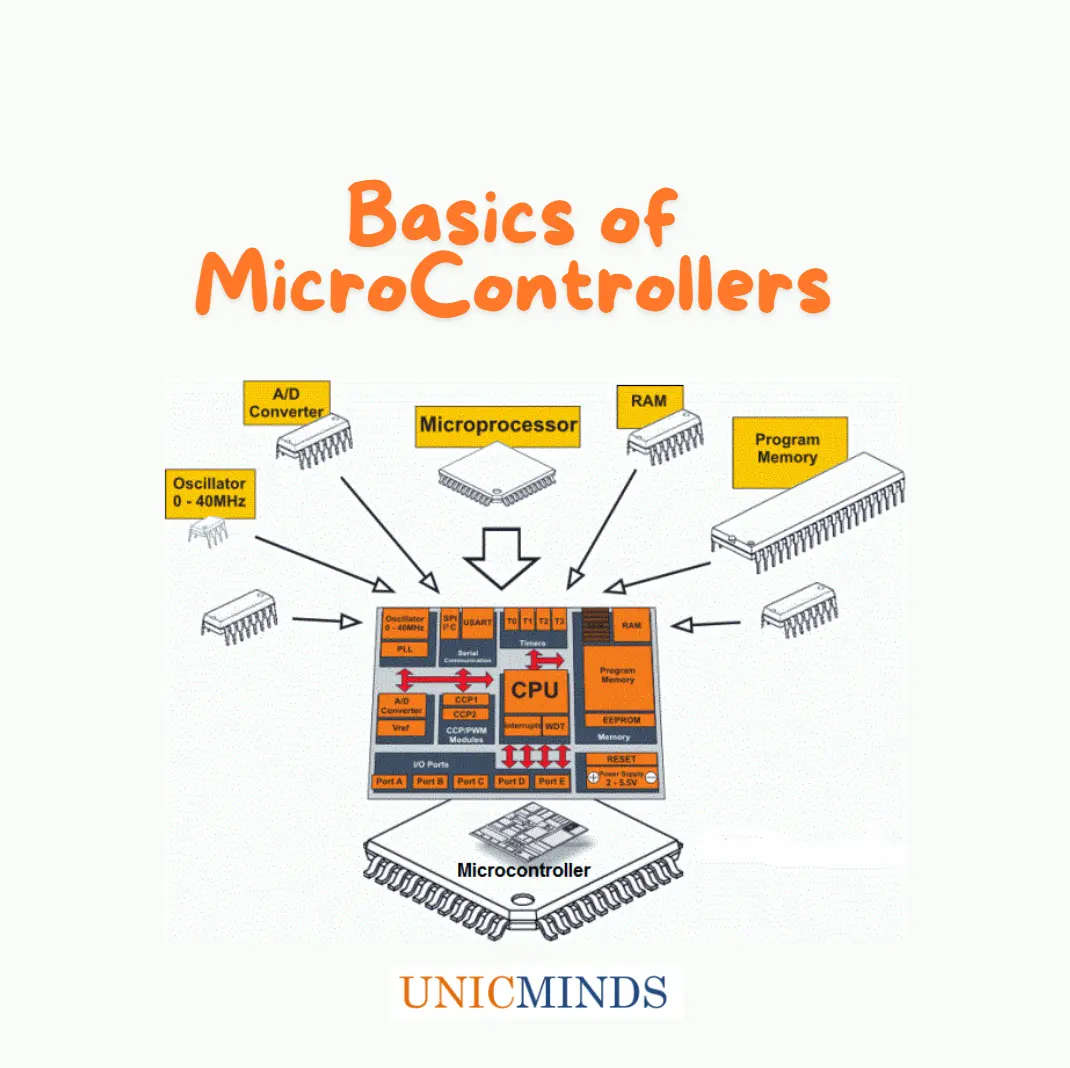
All microcontroller boards embody the next fashions of foremost chip, RAM reminiscence, flash and ROM reminiscence, I/O pins, energy pins, serial ports, timers and sign mills, and different peripherals .


There are various microcontrollers ranging from 8051 to 8096 to Renesas and ATMEGA328P. ATMEGA328P is the title of the microcontroller used on Arduino printed circuit boards. Each microcontroller (MCU) has an working voltage that permits it to carry out various kinds of duties. The ATMEGA328P is designed to function at two totally different ranges: 3.3V for low energy consumption and 5V to 16V for prime energy consumption reminiscent of machine motors and drivers.
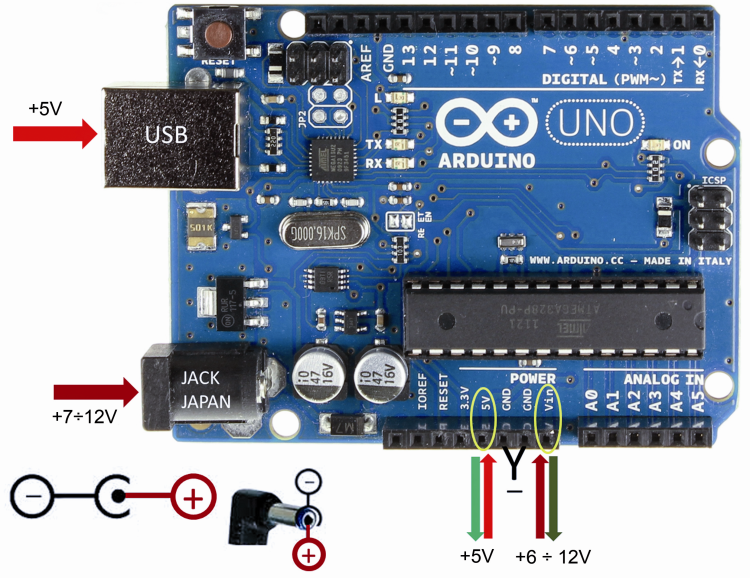
You’ll be able to energy your Arduino board in a number of methods, as proven under. You need to use USB to energy the board at 5V, or if you wish to run one thing like a motor, you need to use the underside barrel jack to offer round 7-12V. Equally, you’ll be able to provide 5V on to the pin, or use the identical pin to connect with get 5V to energy your breadboard or different parts. You need to use Vin 6-12V to provide extra energy or extract extra energy to run a motor or extra (don’t provide lower than 6V at Vin). These are the totally different energy enter output choices accessible. The Vin pin can be utilized to provide 6-12V to the board. Very sensible when it’s worthwhile to join on to the board utilizing an exterior energy provide. And, as you’ll be able to think about, when you use Vin, you have to additionally use floor accurately by connecting it to the exterior energy provide floor. Observe that the USB and DC energy jacks have already got a built-in floor which you can hook up with no matter you need to join. The truth is, the steel elements across the USB connector that you just contact are straight linked to floor!
Each microcontroller (MCU) has an influence pin and must know the working voltage of the board. Microcontrollers sometimes have to fulfill low energy necessities as a result of lots of the gadgets they management are battery-powered. It has enter pins and output pins. For instance, the Arduino Uno has 14 digital pins which are each enter and output bidirectional, and the one analog pin is the analog enter pin. Subsequent, each MCU has a clock, analog-to-digital converter, enter/output connections, communication connections, a Vin pin, a reset pin, a USB jack to dump code from the system, and a 5V or increased energy provide to run the robotic. You have to a jack. 12V battery. Lastly, there’s a chip that’s the mind of the microcontroller board.
Every microcontroller is totally different in its design and has a special set of pins. Nonetheless, there are some primary similarities between all microcontrollers, relying on the aim of their design.requires a microcontroller
- I want a digital enter pin on my microcontroller to obtain digital enter
- I want a digital output pin on my microcontroller to ship a digital output
- First, it’s worthwhile to perceive learn how to create pin enter or output pins on a specific microcontroller and learn how to use the required enter and output pins.
- I/O pins have internally related registers and bus connections.
- Obtain Analog Enter – Enter pin for receiving analog enter in voltage type
- Sending analog output – Arduino doesn’t have analog output pins. Digital output 0 to 255 that’s transformed to analog utilizing a pulse width modulator (PWM).
- Subsequent, it’s best to deal with understanding the peripheral pins.
- You’ll then have the ability to perceive peripheral pins reminiscent of UART, I2C, and SPI.
- A microcontroller wants reminiscence to work like a minicomputer. The commonest varieties of reminiscence current in microcontrollers are RAM, ROM, and EEPROM. The quantity of reminiscence required for every of those varieties relies upon totally on the quantity of labor required by the designed microcontroller.
- Energy Pins – You’ll normally see many energy pins reminiscent of 5V, 3.3V, Vcc, Vdd, Vin, and so on.

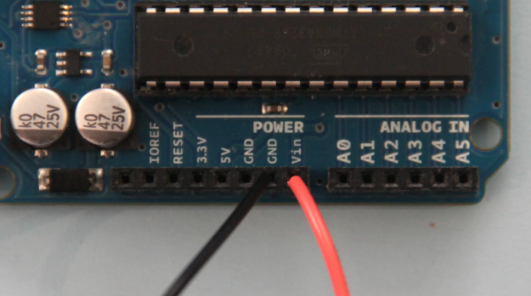
You’ll be able to join the optimistic finish of the battery pack to Vin of Arduino and join the detrimental finish of the battery pack to GND.
- Floor Pin – The Arduino has a number of GND pins, any of which can be utilized to floor your circuit. Normal output pins can’t be used as floor. Digital output terminals or analog output terminals can’t be used as GND. For sure initiatives, it may be used at LOW, which could be very near the GND worth.
- Clock pins – Pins toggle if you execute a scheduled command via an I/O pin or when an information pin is about to the right worth.
- Analog to Digital Converter – Requires an analog to digital converter from analog pins (backside of backside board) to digital output pins (high of backside board).
- Digital to Analog Converter – Arduino doesn’t have a D to A converter, however different boards could have one. On the Arduino Uno, the D to A conversion is managed by pulse width modulation on the digital output pin itself.
Powering the Arduino board
There are 3 ways to energy the Arduino board: through the USB port, the DC barrel plug, and the Vin pin. The 5V pin can be used with an exterior regulated 5V energy provide. You need to use an AC adapter that gives a continuing 5V, or a DC-DC converter linked to a battery or set of batteries. Each the 5V and three.3V pins can be utilized to energy the linked module. Arduino. Nonetheless, you can not use the three.3V pin to energy the Arduino Uno/Nano.

I hope this serves as an introduction to the fundamentals of microcontroller boards. thanks.
Additionally Learn: Microbit Applications – Cube, Hen Sounds, Cease Watch, Movement Blocks for Scratch Programming, What’s Coding for Youngsters?
